Customize your own layouts and views View Management on Surveillance Station
Prerequisites:
- QNAP Turbo NAS running QTS 4.2 or a higher version
- Surveillance Station 5.1 or a higher version
- Operating System: Microsoft Windows 7/ 8
- Web Browser: Google Chrome 43.0.2357.130 m (Windows PC), Microsoft Internet Explorer 10/11 (Windows PC, desktop mode, 32-bit), Mozilla Firefox 39.0 (Windows PC)
Note: The feature is not supported on local display and QVR Client for Mac.
Fisheye cameras provide 360° surround views with a 1:1 aspect ratio. Different megapixel cameras can support different resolutions and aspect ratios, such as Full HD (16:9), QXGA (4:3), and corridor format (9:16). You may want to define view layouts to suit your needs. View Management allows you to customize view layouts, and to assign cameras to specific windows.

View Management provides two modes: normal mode and fisheye mode.
| Button | Description |
|---|---|
 |
Add: Add view |
 |
Edit: Edit view |
 |
Remove: Remove view |
 |
View thumbnail:When you hover over  , it will show thumbnails for your customized view. , it will show thumbnails for your customized view. |
Normal Mode
There are many pre-defined views in the monitoring page. If you want to create a customized view to be shown in the left view tree list in the monitoring page, click ‘Add’ in [Camera Settings] -> [View Management].
Add View
- If you want to choose customized layout, please refer to here to create your own layout.
- To add a camera to a view, drag a physical/virtual camera from the left list to the right channel screen.
- To remove a camera from a view, you can double click on a camera snapshot or drag it to the left camera tree list. You can also click ‘Restore’ to remove all of the cameras.

Customized layout
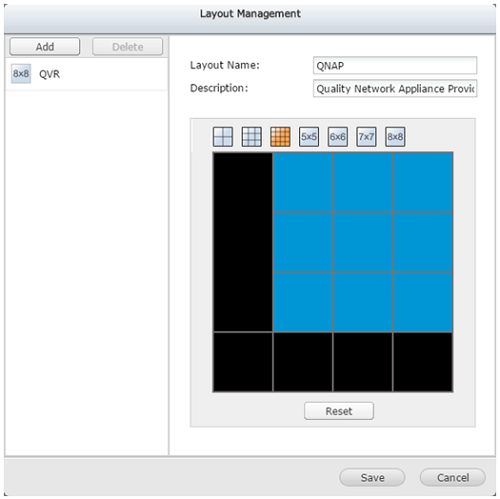
We support some pre-defined layouts. If you want to add a customized layout as a new layout or edit your defined layout, click ‘Layout Management’ in ‘Add View’ or ‘Edit View’ window first. You can then click ‘Add’ to add the layout or choose the layout to edit the layout in the right zone.
- Choose a type of pre-defined layout.
-
To customize the layout, click a square and draw a larger rectangle to combine the squares. And you can double click the combined region to restore it. Or you can click ‘Restore’ to restore the original layout.

- To finish, click ‘Save’ and it will show on left tree list.
- Click ‘Cancel’. You can then find your defined layout in the dropdown list of layout list.
Fisheye Mode
For fisheye cameras, click ‘Add’ to add the below display mode under ‘Fisheye’ tab. You can then use the customized view in the left view tree list in the monitoring page.
| Display Mode | Description |
|---|---|
| 9R Mode | Provides 9 regional screens |
| 4R Mode | Provides 4 regional screens |
| 1O8R Mode | Provides an original screen in the center, and 8 regional screens around it |
| 1P6R Mode | Provides an original screen in the center, and 6 regional screens around it |
| Dual Panorama | Provides 2 panorama screens |
| 1P3R Mode | Provides 3 regional screens in the upper side, and one panorama screen below |
| 1P2R Mode | Provides 2 regional screens in the upper side, and one panorama screen below |
| OPR Mode | Provides one original screen one regional screen, and one panorama screen |
| 1O3R Mode | Provides an original screen, and 3 regional screens |
| R Mode | Provides one regional screen |
| Full Panorama | Provides one panorama screen |
Add View
- Select a fisheye camera.
- Choose a display mode.
- To alter the size/ drag position in preview, use the mouse wheel to zoom in/out. Then you can see the view.

View management’s application
You can choose the view mode in the left tree’s view tab on the monitor.


