How to use Qsync to synchronize files between the NAS and my other devices?
- Qsync
- System Requirements
- Getting Started
- Installation
- Synchronization
- Synchronization Settings
- Qsync Central
Qsync
This applies to the following application versions (and later): Qsync Central 4.2.0.0, Qsync Client 5.0.0 for Windows, Qsync Client 5.0.0 for Mac, Qsync Pro 1.4.0 for Android, and Qsync Pro 1.1.0 for iOS.
|
Device |
Application |
|---|---|
|
QNAP NAS |
Qsync Central |
|
Windows or Mac |
Qsync Client |
|
Mobile |
Qsync Pro |
Business users can use Qsync to enhance teamwork and collaboration, while home users can easily access and share their multimedia files.
System Requirements
Qsync Central
Qsync Central supports all NAS models and all versions of QTS.
Qsync Client
-
Qsync Client for Windows, macOS, and Ubuntu are available in QNAP Utilities.
-
The following operating systems support Qsync Client.
Platform
Operating System Version
Windows
-
Windows 8 (or later)
-
Windows Server 2016 (or later)
macOS
-
macOS 10.14 (or later)
Linux
-
Ubuntu Desktop 20.04 LTS
-
Ubuntu Desktop 18.04 LTS
-
Qsync Pro
-
Qsync Pro for Android and iOS are available in the Google Play Store or the App Store.
-
Qsync Pro requires the QNAP NAS to run QTS 4.3.6 (or later) and Qsync Central.
-
The following mobile versions support Qsync Pro.
Platform
Mobile System Version
Android
-
Android 7.0 (or later)
iOS
-
iOS 11 (or later)
-
Getting Started
You must install Qsync Central and turn on synchronization access to shared folders in Qsync Central to start syncing files between your NAS and other devices.
Installation
This section explains how to install the applications you need to start syncing your files.
Installing Qsync Central
Before installing Qsync Central, ensure that a default volume is configured on the NAS. For details, see the volumes section of the QTS User Guide.
- Go to App Center, and then click
 .
.
A search box appears.
Installing Qsync Client on Windows or macOS
This task explains installing the Qsync Client from your web browser. You can also install the Qsync Client through Qsync Central. For details, go to Overview.
Installing Qsync Client on Ubuntu
Installing Qsync Pro on Android and iOS
This task describes installing Qsync Pro for Android and iOS from Qsync Central. You can also install Qsync Pro directly on the Google Play Store or on the App store.
- Open Qsync Central, and then click Start to use Qsync.

Four installation options appear.
Synchronization
This section explains how to synchronize files and folders between your NAS and your device.
-
Qsync Central must be enabled to sync files. The application is automatically enabled by default and must stay enabled for file synchronization.
-
Synchronization access to shared folders must be enabled to sync files between that folder and your device. Shared folders do not have synchronization access by default. For details, see Enabling Shared Folder Synchronization on the NAS.
Enabling Shared Folder Synchronization on the NAS
-
Only administrators can enable or disable synchronization access.
-
Non-administrators with read and write access to a shared folder can sync files between your NAS and other devices.
- Under the Grant column, enable the shared folders you want Qsync clients to access.

Adding a NAS and Paired Folders for Synchronization
Depending on which device you want to sync your files to, you must add a NAS and a paired folder using Qsync Client or Qsync Pro. For details on syncing between your computer and your NAS, go to Adding a NAS and Paired Folders from Qsync Client. For details on syncing between your mobile device and your NAS, go to Adding a NAS and Paired Folders from Qsync Pro.
Adding a NAS and Paired Folders from Qsync Client
Adding a NAS from Qsync Client synchronizes files between the NAS and computer.
- Perform any of the following actions.
Action
User Action
Add a folder pair
-
Click Add.
-
Select a folder on the NAS.
-
Click
 .
.The Folders on the NAS window opens.
-
Select an unpaired NAS folder.
Important:You must grant synchronization access to the folder you want to pair. For details, go to Enabling Shared Folder Synchronization on the NAS.
Tip:Click Refresh to reload the NAS unpaired folders.
-
Click Apply.
-
-
Select a local folder.
-
Click
. -
Select a folder.
Tip:Click Make New Folder to add a new folder.
-
Click OK.
-
-
Optional: Use selective synchronization.
-
Click Select.
The Selective Synchronization window appears.
-
Select the folders you want to synchronize.
-
Click Apply.
-
-
Click Apply.
Configure the folder pairing settings
-
Click
 .
. -
Optional: Modify the folders on the NAS.
-
Click
.The Folders on the NAS window opens.
-
Select an unpaired NAS folder.
Important:You must grant synchronization access to the folder you want to pair. For details, go to Enabling Shared Folder Synchronization on the NAS.
Tip:Click Refresh to reload the NAS unpaired folders.
-
Click Apply.
-
-
Optional: Modify the paired local folder.
-
Click
. -
Select a folder.
Important:To avoid unexpected issues, do not pair a folder in a cloud drive (such as OneDrive, iCloud, Dropbox, or Google Drive).
Tip:Click Make New Folder to add a new folder.
-
Click OK.
-
-
Optional: Use selective synchronization.
-
Click Select.
The Selective Synchronization window opens.
-
Select the folders you want to synchronize.
-
Click Apply.
-
-
Click Apply.
Remove the paired local folder.
Click
 .
. -
Adding a NAS and Paired Folders from Qsync Pro
- Specify the NAS.
Method
User Action
Add a NAS manually
-
Tap Add NAS manually.
-
Enter the NAS IP address or myQNAPcloud name.
-
Enter your username and password.
-
Select Secure login (SSL).
-
Optional: Configure advanced settings.
Note:QNAP recommends using the default settings.
-
Tap Advanced settings.
-
Deselect Detect port automatically.
-
Tap More.
-
Configure port settings as needed.
-
-
Tap Log in.
-
Optional: Add one or more paired folders.
Tip:Tap Skip to continue without adding folder pairs.
Important:If you continue without adding paired folders, you must manually add a paired folder to start synchronizing between your device and the NAS.
Tap
 , and then tap Manage Paired Folders and complete the following steps.
-
Tap
 .
.The Add Paired Folders screen appears.
-
Select a folder from your Android device.
-
Select a NAS folder.
-
Select your sync method.
Choose from the following options:
-
Two-way: Changes in the paired folders reflect in both directions.
-
One-way upload from device: Only changes in the paired folder on your local device reflect on the NAS but not the other way around.
-
One-way download from NAS: Only changes in the paired folder on your NAS reflect on your device but not the other way around.
-
-
Tap Apply.
-
Tap Next.
-
-
Optional: Configure settings.
Add a NAS using QNAP ID
-
Tap Sign in QNAP ID.
The Add QNAP ID screen appears.
-
Enter your email address and password.
-
Tap Sign in.
A list of connected NAS devices appears.
-
Tap the NAS you want to add.
-
Enter your username and password.
-
Optional: Add one or more folder pairs.
Tip:Tap Skip to continue without adding folder pairs.
Important:If you continue without adding paired folders, you must manually add a paired folder to start synchronizing between your device and the NAS.
Tap
, and then tap Manage Paired Folders and complete the following steps.-
Tap
.The Add Paired Folders screen appears.
-
Select a folder from your Android device.
-
Select a NAS folder.
-
Select your sync method.
Choose from the following options:
-
Two-way: Changes in the paired folders reflect in both directions.
-
One-way upload from device: Only changes in the paired folder on your local device reflect on the NAS but not the other way around.
-
One-way download from NAS: Only changes in the paired folder on your NAS reflect on your device but not the other way around.
-
-
Tap Apply.
-
Tap Next.
-
-
Optional: Configure settings.
-
Synchronizing Files Between the NAS and Your Device
This task explains how to sync new files from the NAS to your device.
Managing Paired Folders
This section explains how to add, edit, delete, or pause your synchronization tasks.
Managing Paired Folders on Qsync Client
- Perform any of the following tasks.
Task
User Action
Pause a synchronization task
Identify a synchronization task you want to pause, and then click
 .
.Resume a synchnronization task
Identify a synchronization task you want to resume, and then click
 .
.Configure the paired folder settings
-
Identify the pair of folders you want to modify, and then click
.The Paired Folder Settings window opens.
-
Optional: Use selective synchronization.
-
Click Select.
The Selective Synchronization window opens.
-
Select the folders you want to synchronize.
-
Click Apply.
-
-
Click Apply.
Pair folders
-
Click Add.
The Add Paired Folders window opens.
-
Identify a shared NAS folder you want to pair with a local folder.
-
Click
 .
.The folder selection window opens.
-
Select the local folder you want to pair.
Important:To avoid unexpected issues, do not pair a folder in a cloud drive (such as OneDrive, iCloud, Dropbox, or Google Drive).
Tip:Click Make New Folder to add a new folder.
-
Click OK.
Qsync applies the changes.
Unpair folders
-
Identify a pair of folders you want to unpair, and then click
.A notification message appears.
-
Select an option.
-
Keep all files on the NAS and on this device.
-
Delete all synchronized files from this device, but keep the files on the NAS.
-
-
Click OK.
Qsync unpairs the folders and applies your setting.
-
Managing Paired Folders on Qsync Pro
- Tap .
- Identify a folder pair you want to manage, and then tap
 .
. - Select a task.
Task
User Action
Edit
Tap Edit.
The Edit Paired Folders screen appears.
Tip:You can also tap the folder pair to go to the Edit Paired Folders screen.
-
Optional: Use selective synchronization.
-
Tap Selective Sync.
The Selective Sync screen appears.
-
Select the folders you want to synchronize.
-
Tap Apply.
-
-
Optional: Change your sync settings.
-
Select an option.
-
One-way upload from device
-
One-way download from NAS
- Two-way
-
-
Tap Apply.
-
-
Optional: Unpair the folder.
-
Tap Unpair.
A notification message appears.
-
Select an option.
-
Keep all files on the NAS and on this device.
-
Delete all synchronized files from this device, but keep the files on the NAS.
-
-
Tap OK to unpair the folder.
-
Pause
Tap Pause.
Tip:To resume synchronization, tap
next to the paused folder pair, and then tap Resume.Delete
Tap Delete.
A notification message appears.
-
Select an option.
-
Keep all files on the NAS and on this device.
-
Delete all synchronized files from this device, but keep the files on the NAS.
-
-
Tap OK to unpair the folder.
Sync now
Tap Sync now.
-
Synchronization Settings
Depending on your needs, you can choose to enable Space-Saving Mode or Smart Delete File Management for better control over your synced files.
Space-Saving Mode
This only applies to Qsync Client 5.0.0 or later and requires Windows 10 version 1909 or above for Windows users.
Space-Saving Mode allows you to view files without downloading them to your device. You can download files only when you need to open and edit them. Space-Saving Mode allows you to save disk space on your computer, synchronize files faster, and avoid a server overload.
After enabling Space-Saving Mode, you can change online-only or locally available files to files that are always available. For more information regarding file statuses after enabling Space-Saving Mode, refer to the following table:
|
Status |
Description |
|---|---|
|
Online-only |
You can see the files on your computer, but the files do not take up space. The file is not downloaded to your device until you open it. Newly created files on the NAS will appear locally as Online-only files. For details on changing the file status, see Changing Space-Saving Mode File Status Note:
|
|
Locally available |
You can see and edit files on your computer. These files take up space. After opening an online-only file, the file becomes locally available. A locally available file may become online-only if Free up space is performed or Windows Storage Sense is activated. For more information on Free up space, see Freeing Up Space (Qsync 5.0.6 Win/5.0.5 macOS) or Freeing Up Space (Qsync 5.0.5 Win/5.0.4 macOS). Note:
|
|
Always available |
You can see and edit files on your computer. The files are downloaded to your computer and take up disk space. Note:
|
 icon.
icon. icon.
icon. icon.
icon.Depending on your operating system, Space-Saving Mode has specific folder restrictions. Qsync Client allows Space-Saving Mode for the following folder types.
|
Windows |
macOS |
|---|---|
|
|
Space-Saving Mode and Smart Delete File Management cannot be enabled at the same time. Enabling Space-Saving Mode automatically disables Smart Delete File Management.
Enabling Space-Saving Mode
- Open Qsync Client.
Note:
Ensure you are on Qsync Client's main page. If you are accessing Qsync Client from the toolbar, click
 to go to the main page.
- Click Add.
Tip:
To enable Space-Saving Mode on existing paired folders, click
.The Select folders to sync window opens.
- Under Space-Saving Mode, select Enable.
Figure 1. Qsync 5.0.6 Windows/Qsync 5.0.5 macOS
 Figure 2. Qsync 5.0.5 Windows/Qsync 5.0.4 macOS
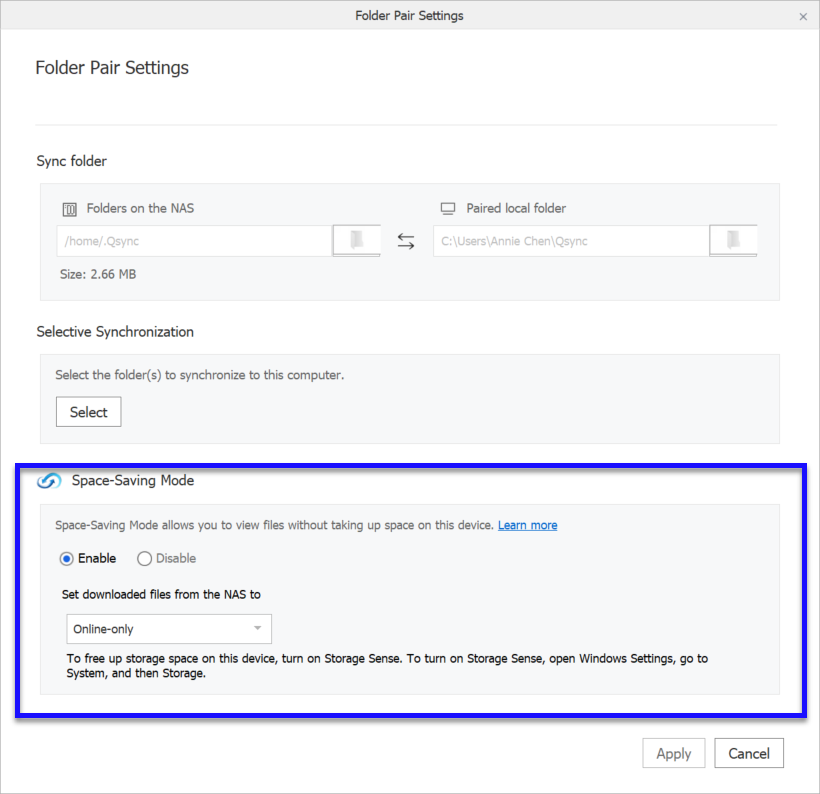
Changing Space-Saving Mode File Status
After enabling Space-Saving Mode, you can right-click a file or folder and select Space-Saving Mode to change the file status. For information on these statuses, go to Space-Saving Mode.
- Right-click on a file or folder and select Space-Saving Mode.
Figure 1. Qsync 5.0.6 Windows/Qsync 5.0.5 macOS
 Figure 2. Qsync 5.0.5 Windows/Qsync 5.0.4 macOS
Freeing Up Space (Qsync 5.0.6 Win/5.0.5 macOS)
When Space-Saving Mode is enabled for a paired folder, you can reduce the size of synced files by freeing up space. When freeing up space, locally available files will become online-only. Files with an always available status will not be affected. Freeing up space can be done automatically or manually by using the settings below.
Windows Storage Sense can also be used on Windows computers to automatically free up space. For more information, see https://support.microsoft.com/en-us/office/use-onedrive-and-storage-sense-in-windows-10-to-manage-disk-space-de5faa9a-6108-4be1-87a6-d90688d08a48.
- Click Free up space.

Freeing Up Space (Qsync 5.0.5 Win/5.0.4 macOS)
When Space-Saving Mode is enabled for a paired folder, you can reduce the size of synced files by freeing up space. When freeing up space, locally available files will become online-only. Windows Storage Sense can also be used on Windows computers to automatically free up space. For more information, see https://support.microsoft.com/en-us/office/use-onedrive-and-storage-sense-in-windows-10-to-manage-disk-space-de5faa9a-6108-4be1-87a6-d90688d08a48.
- Click Free up space.

Smart Delete File Management
This section explains how to use Smart Delete File Management. The feature allows you to restore removed files from paired folders to your device or delete them from your NAS.
You must select Smart delete from the NAS settings on your device to use the Smart Delete File Management features. For details, see the Qsync Client and Qsync Pro documentation.
Restoring and Deleting Files Using Qsync Client
Restoring and Deleting Files Using Qsync Pro
- Open Qsync Pro, and then tap .
- Identify a file, and then tap .
Qsync Central
This applies to Qsync Central 4.2.0.0 (and later).
Qsync Central is a file synchronization application for your NAS that is downloadable from the App Center. Qsync Central is a required application for you to sync files between your NAS and your device. When you add files to your designated sync folders, the specified folders and files become available on the NAS and on all linked devices.
Overview
The Overview screen displays the configuration mode, number of online devices, and users synchronized with Qsync. On this screen, you can enable Qsync, download Qsync applications to your computer or mobile device, manage Qsync files from a browser, or synchronize your files over the internet.

|
No. |
Description |
User Action |
|---|---|---|
|
1 |
Enables or disables Qsync Central |
Click Important:
Qsync Central must be turned on to synchronize files. |
|
2 |
Displays the current mode to manage Qsync users |
|
|
3 |
Displays CPU and memory usage of applications on the NAS |
N/A |
|
4 |
Displays used storage space and the Qsync Central quota on the NAS. |
N/A |
|
5 |
Displays how many users are currently online |
Click Details to go to Usersto turn on or turn off Qsync access to users. |
|
6 |
Displays how many devices are currently online |
Click Details to go to Devices to check a device's connection status. |
|
7 |
Displays the installation options for Qsync Client |
Click Important:
Qsync Client must be installed on your computer to synchronize files between your NAS and your computer. |
|
8 |
Displays the installation options for Qsync Pro |
Click Important:
Qsync Pro must be installed on your mobile device to synchronize files between your NAS and your mobile device. |
|
9 |
Views and synchronizes files and folders from File Station |
Click File Station opens. |
|
10 |
Views and synchronizes files and folders from myQNAPcloud |
Click myQNAPcloud opens. |
 to turn on or turn off
  for a Windows operating system or
  for a macOS operating system to install
  for an Android mobile device or
  .
. .
.Management Settings
Management settings allow administrators to choose whether a user or administrator can set Qsync preferences.
Configuring Management Settings
Configuring Synchronization Settings
Configuring Policy Settings
- Modify the filter settings.
Qsync skips files based on these settings.
- Perform any of the following tasks.
Task
User Action
Add a keyword.
-
Specify a keyword to filter.
Tip:-
Use an asterisk (*) before or after the keyword to signify a variable.
-
Refer to the table below for the accepted formats.
-
-
Click Add.
-
Click Apply All.
Remove a keyword.
-
Select a keyword.
-
Click
 .
.
-
- Perform any of the following tasks.
Users
The Users screen displays all user statuses on Qsync. On this screen, you can search, allow or deny access, and modify shared folder permission for each user. On the All users screen, you can create a user, search, allow or deny access, and modify shared folder permission for each user.
Creating a User
This task explains how to create a local user from Qsync Central. To create a domain user, see Domain Security under Privilege in the QTS User Guide.
Modifying Qsync Access
Modifying Shared Folder Permissions
- Under Edit, click
 .
.
The Edit Shared Folder Permissions window appears.
Devices
The Devices screen displays the devices synchronized with Qsync. On this screen, you can search connected devices, search by user, block devices, erase Qsync data, and modify each device's settings.
Managing Devices
- Under the Action column, perform one of the following actions.
Description
User Action
Edits Qsync settings for the device.
-
Click
.The Synchronize setting window appears.
-
Modify the settings.
For details, see:
Views the event logs for the device.
Click
 .
.The Event Logs window appears.
Views the options for the device.
-
Click
 .
. -
Select an option.
-
Block this device
-
Remove this record
-
Remotely erase device
-
Qsync performs the specified action.
-
Configuring Synchronization Settings
- From the Devices list, identify the device you want to modify then click > Synchronize.
Configuring Policy Settings
- From the Devices list, identify the device you want to modify, and then click > Policy.
- Modify the filter settings.
Qsync skips files based on these settings.
- Perform any of the following tasks.
Task
User Action
Add a keyword.
-
Specify a keyword to filter.
Tip:-
Use an asterisk (*) before or after the keyword to signify a variable.
-
Refer to the table below for the accepted formats.
-
-
Click Add.
-
Click Apply All.
Remove a keyword.
-
Select a keyword.
-
Click
.
-
- Perform any of the following tasks.
Shared Folders
The Shared Folders allow administrators to turn on or turn off synchronization of shared folders and edit shared folders. If synchronization is enabled, users with read and write privileges of shared folders can synchronize the contents with other devices via the Qsync client utilities.
Modifying Shared Folder Permissions
- Identify the folder you want to modify under Permission then click .
The Edit Shared Folder Permissions window appears.
Team Folders
You can share the folders in the Qsync folder as team folders. From the Team Folders screen, you can add a team folder, edit user acess to team folders, and unshare a team folder. Team folders do not have file restrictions and allow easier file sharing compared to using emails. The team folder can serve as a file exchange platform for greater teamwork.
Sharing Team Folders
Modifying Team Folder Users
- Under the Action column, perform one of the following tasks.
Description
User Action
Edits user permissions to a team folder.
-
Click
.The Share Team Folder window appears.
-
Select Local Users or Domain Users.
-
Select the users that can access the shared folders.
-
Click OK.
Unshares a team folder.
-
Click
 .
.A confirmation message appears.
-
Click Yes.
-
Shared File Links
The Shared File Links displays the share links created by every user. You can search by specific users or file names on this screen. For details on how to create a share link, see the QTS User Guide.
Version Control
Version Control allows users to keep separate versions of a file whenever it is modified. Users can retrieve a specific version of the file at any time and anywhere.
Configuring Version Control Settings
Configuring Advanced Version Control Settings
Event Logs
The Event Logs screen allows you to view Qsync logs for all synchronized devices. You can search by user, device, action, and details.
Searching Device Event Logs
- Perform one of the following actions.
Task
User Action
Filters logs.
-
Click
 .
. -
Search by user
-
Click Local Users or Domain users
-
Click
 or type a username.
-
-
Search by device.
-
Type a device name.
-
-
Search by action.
-
Click
or type a username.
-
-
Search by details.
-
Type an activity the user performed.
-
-
Click Apply.
Refreshes the window.
Click
 .
. -


