How to set up and use QuFTP Service
- About QuFTP Service
- Managing User Settings
- Managing User Group Settings
- Managing Shared Folder Permissions
- Managing QuFTP Service Rules
- Managing FTP Remote Connections
- Monitoring QuFTP Service settings
About QuFTP Service
QuFTP Service is a built-in File Transfer Protocol (FTP) application that allows system administrators to add and manage multiple FTP users and user groups, assign permissions to local and remote folders, and share local and remotely-mounted files across networks.
Configuring FTP Server Settings
Configure the FTP server to securely transfer files across the network using Secure Sockets Layer (SSL) and Transport Layer Security (TLS) protocols, and manage user access to FTP functions. You can also define the bandwidth and connection limitations for user accounts and enable passive FTP to allow FTP clients to establish data connections.
Configuring General FTP Server Settings
- Open QuFTP Service.
- Go to FTP Server > System > General.
- Select Enable the FTP server.
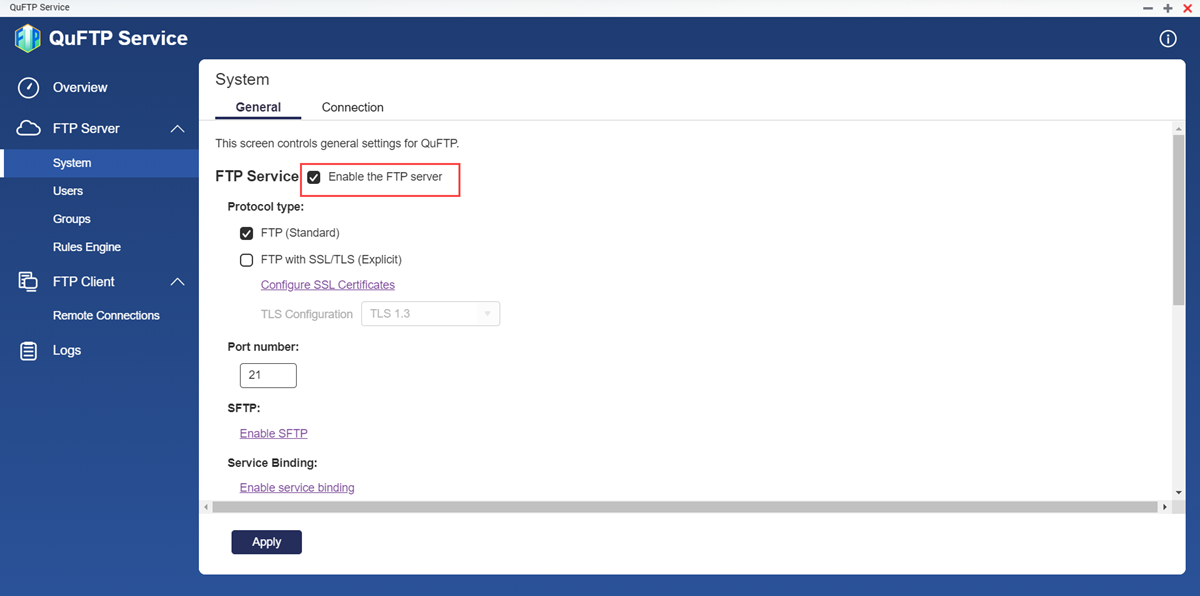
- Configure the FTP protocol settings.
- FTP (Standard): Enable to use FTP with implicit SSL/TLS function. The server uses port 21 for secured and unsecured services.NoteFTP (Standard) is enabled by default.
- FTP with SSL/TLS (Explicit): Enable to use FTP with explicit SSL/TLS functionality. Once the connection is established, the server uses the configured SSL certificates and selected TLS configuration to secure the connection.
- FTP (Standard): Enable to use FTP with implicit SSL/TLS function. The server uses port 21 for secured and unsecured services.
- Configure the FTP with explicit SSL/TLS settings.
- Click Configure SSL Certificates to update the SSL certificate.TipTo configure the SSL certificates, see the SSL certificate installation section of the QTS User Guide.
- Select the TLS protocol version.ImportantBefore selecting TLS 1.2 or later, ensure that all FTP clients support TLS 1.2.
- Click Configure SSL Certificates to update the SSL certificate.
- Specify the FTP port number.NoteBy default, FTP communications use port 21.
- Configure the SFTP and service binding settings.
Setting User Action Enable SFTP To configure SFTP, see the Telnet/SSH section of the QTS User Guide. Enable service binding To configure service binding, see the service binding configuration section of the QTS User Guide. - Configure additional FTP server settings.
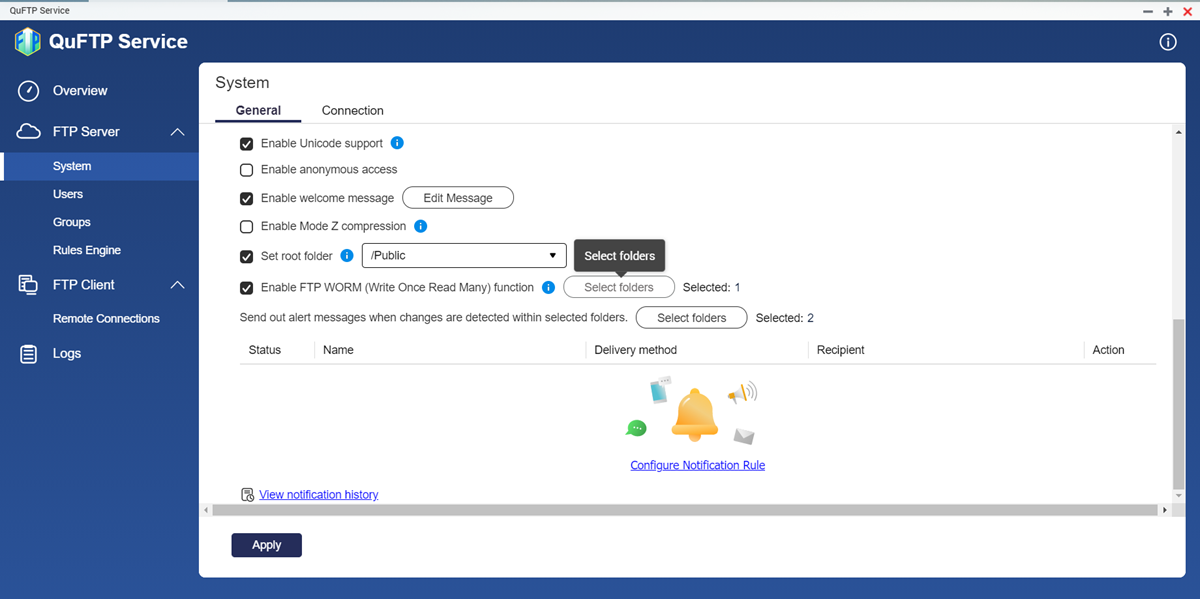
Setting User Action Enable Unicode support Enable to allow the FTP server to support UTF-8 character encoding during file transfer. Enable anonymous access Enable to allow users to access the service without needing to log in. NoteQNAP does not recommend using anonymous FTP. Enabling this function permits any user to access the FTP service without identification and could pose a security risk.Enable welcome message Enable to specify a message that displays when FTP clients log in. - Click Edit Message.
- Specify the welcome message.
- Click Apply.
Enable Mode Z compression Enable to allow the FTP clients to use the zlib software library to compress data transfers. Set root folder Enable to select the default FTP directory for FTP clients. ImportantTo use this feature, you must first provide root folder access to all the FTP clients in Users > Edit Shared Folder Permission.
Alternatively, you can enable root folder access in Control Panel > Privilege > Shared Folders.Enable FTP WORM (Write Once Read Many) function Enable to implement WORM permissions on specified folders. - Click Select Folders.
The Select WORM (Write Once Ready Many) Folders window appears.
- Select the folders.
- Click Apply.
NoteWORM folders cannot be erased or modified by FTP users. - Configure alert notifications for selected folders.
- Next to Send out alert messages when changes are detected within selected folders, click Select Folders.
The Select folders to monitor window appears.
- Select the folders from the local volume.
The folder path appears in the right panel.
TipClick to remove the selected folder.
 - Specify the time interval to send out alerts.
- Click Apply.
- Click Configure Notification Rule.
Notification Center opens and the Create event notification rule window appears.
- Next to Send out alert messages when changes are detected within selected folders, click Select Folders.
- Click Apply.
QuFTP Service applies the settings and restarts.
Configuring FTP Server Connection Settings
- Open QuFTP Service.
- Go to FTP Server > System > Connection.
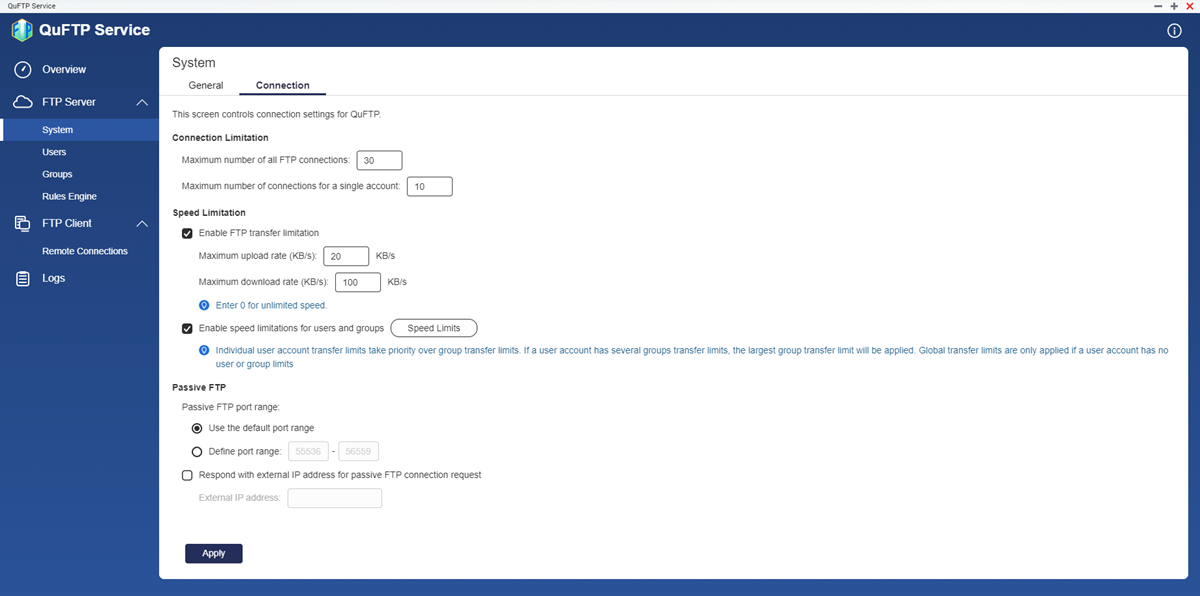
- Configure the FTP connection limitations.
- Specify the maximum number of allowed FTP connections.
- Specify the maximum number of connections per FTP user.
- Configure the FTP speed limitations.
Setting User Action FTP transfer limitations - Click Enable FTP transfer limitations.
The FTP bandwidth settings become accessible. - Specify the maximum upload rate.
- Specify the maximum download rate.
Speed limitations - Click Enable speed limitation for users and groups.
The speed limitation settings become accessible. - Click Speed Limits.
The Speed Limits window appears. - Select the FTP client type.
- Under Active, select the user or user group checkbox.
- Specify the maximum upload and download rate.
- Click Apply.
- Click Enable FTP transfer limitations.
- Configure the passive FTP settings.Note
- The Use the default port range setting is enabled by default.
- The default passive FTP port range is 55536-56559.
- Select Define port range.
- Specify the passive FTP port range between 1025 and 65535.
- Select Respond with external IP address for passive FTP connection request.NoteSpecify an external IP address only when the FTP server is behind the NAT configuration.
- Specify the external IP address.
- Click Apply.
QuFTP Service applies the settings.
Managing User Settings
An FTP account allows users to access files on your device via FTP. You can create multiple users and also configure selective access to directories within the device domain. An FTP user can gain access to different FTP directories by being a member of multiple user groups. The admin user account is the default FTP user account. It can configure settings, create users, and install applications.
- You cannot delete the default user account.
- Users can access the FTP directories only if FTP server is enabled in QuFTP Service and FTP privilege is enabled in Users. For details, see:
- FTP users do not share the same privileges as a local QNAP user. FTP users are not provided application or service privileges in QuFTP Service.
- FTP privileges are automatically enabled for all FTP users.
- Go to FTP Server > Users.
The Users page appears. - Configure the settings.
Task User Action Creating an FTP user - Go to FTP Server > Users.
- Click Create > Create an FTP User.
The Create an FTP User window appears. - Configure the FTP user settings.
The FTP user settings are identical to the QTS local user settings. To configure the FTP user settings, see the local user creation section of the QTS User Guide.
ImportantFTP users can only access the FTP server application. All other application privileges are blocked.
To grant access to other applications, go to Control Panel > Privilege > Users > Edit Application Privilege.Creating multiple users - Go to FTP Server > Users.
- Click Create > Create Multiple Users.
- Configure the multiple user settings.
To configure the multiple user settings, see the multiple user creation section of the QTS User Guide.
Importing users - Go to FTP Server > Users.
- Click Create > Batch Import FTP Users.
- Select Import user and user group settings.
- Configure the import user settings.
To import users and user groups settings, see the user import section of the QTS User Guide.
Exporting users - Go to FTP Server > Users.
- Click Create > Batch Import FTP Users.
- Select Export user and user group settings.
- Click Next.
QuFTP Service exports the user and user settings to the local device in BIN format.
Modifying User Account Settings
- Go to FTP Server > Users.
The Users page appears.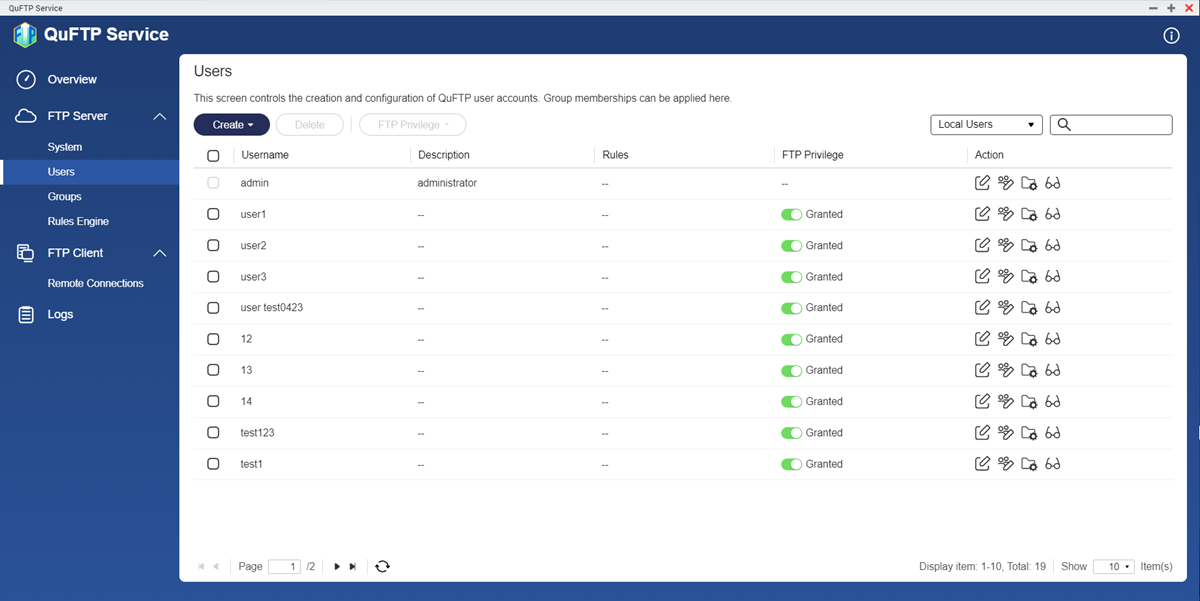
- Identify a user.
- Under Action, click
 .
.
The Edit Account Profile window appears.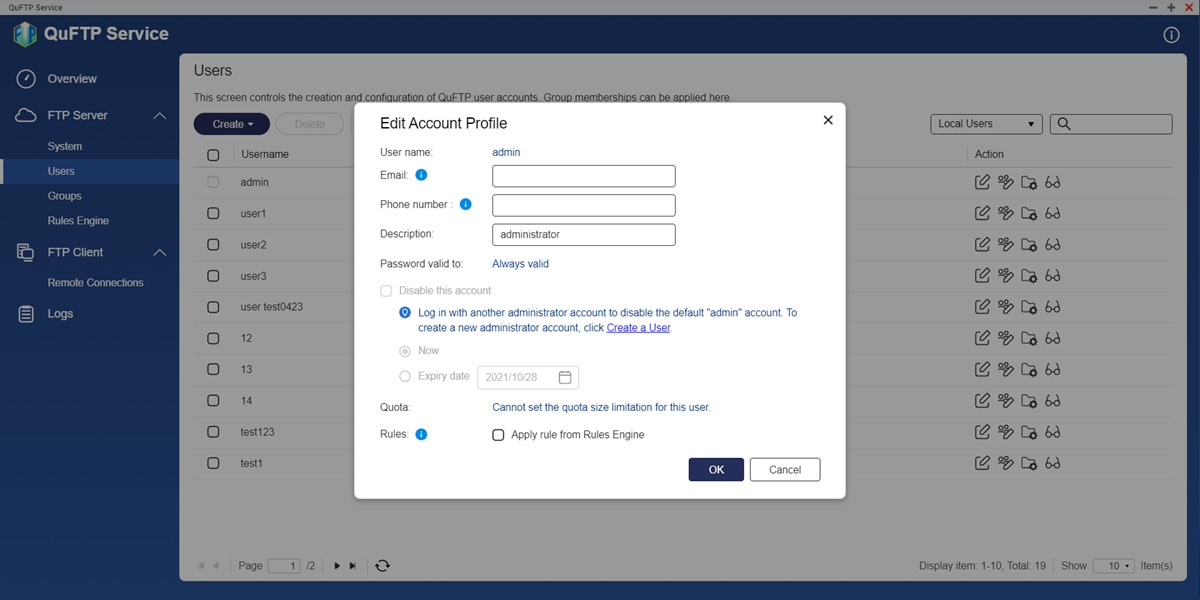
- Optional: Specify the email address and phone number.
- Enter a user description up to 50 characters.
- Edit the settings.NoteThe Edit Account Profile window provides the following settings that are not included in the Create an FTP User window.
Setting Description Disallow the user to change password Select to prevent the user from changing the password. Disable this account Select to disable the user account. You can either select to disable the account Now or specify an Expiry Date. - Assign FTP rules to the user account.
- Enable Apply rule from Rules Engine.
- Select the FTP rule from the drop-down list.NoteTo create a new FTP rule, see Creating an FTP Rule.
- Click OK.
QuFTP Service updates the user account information.
Assigning User Groups to a User
You can assign multiple user groups to a user account to better file access.
- Go to FTP Server > Users.
The Users page appears. - Identify a user.
- Click
 .
.
The Edit User Group window appears.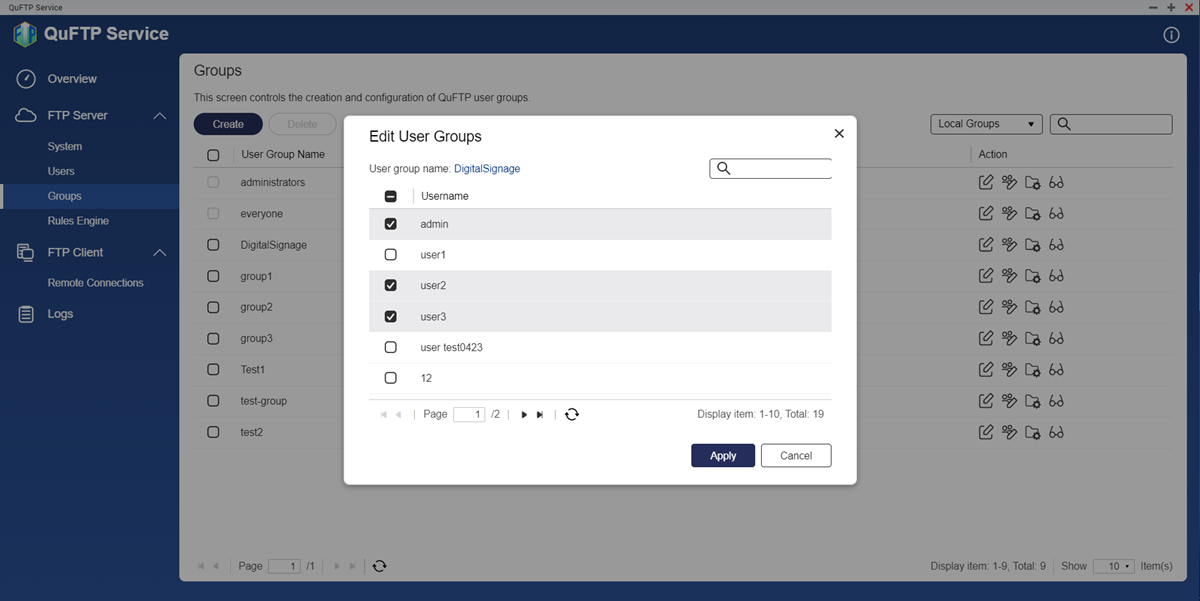
- Select the user groups.
- Click Apply.
QuFTP Service assigns the selected user groups to the user.
Deleting a User
- Go to FTP Server > Users.
The Users page appears. - Identify a user.
- Next to the username, click
 .
. - Click Delete.
A confirmation message appears.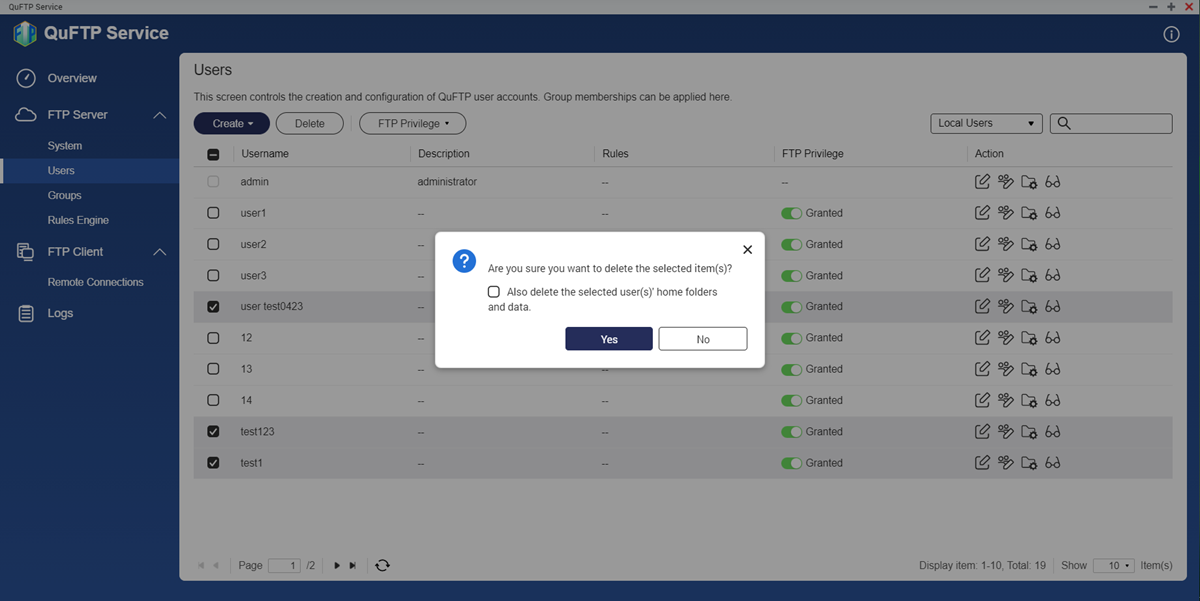
- Click OK.
QuFTP Service deletes the selected users.
Managing FTP User Privileges
- Go to FTP Server > Users.
The Users page appears. - Select a method for changing the FTP access.
- Next to the username, click
 .
. - Click FTP Privilege.
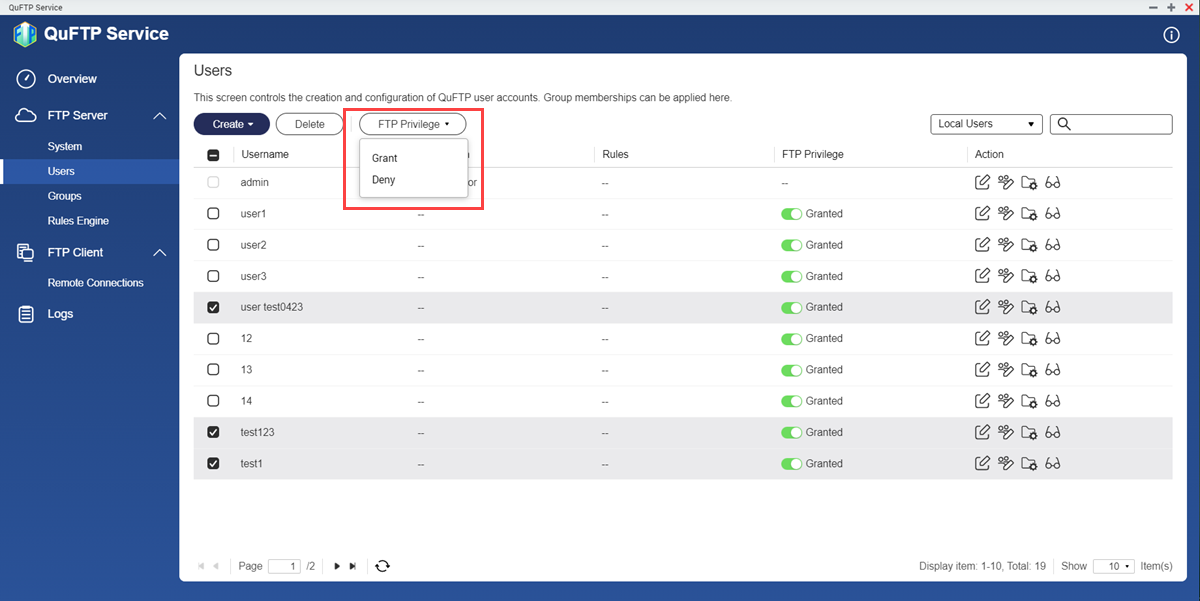
- Change the FTP access for the selected users.
- Grant: Select to enable FTP privilege
- Deny: Select to disable FTP privilege
- Identify an FTP user.
- Change the FTP access for the user.
 : Click to provide FTP access to the user
 : Click to deny FTP access to the user
- Next to the username, click
QuFTP Service updates the FTP privilege.
Managing User Group Settings
User groups allow you to assign permissions and control access for multiple user accounts simultaneously.
- User groups can access the FTP directories only if FTP server is enabled in QuFTP Service. For details, see Configuring General FTP Server Settings.
- User groups do not share the same privileges as local QNAP user groups. FTP users are not provided application and service privileges in QuFTP Service.
QuFTP Service has two default user groups.
| User Group | Description |
|---|---|
| administrators | Users in this group can configure settings, create users, and install applications. You cannot delete this group. |
| everyone | Users in this group can only view and modify files. This group contains all local FTP user accounts and can be used to grant shared folder permissions to all local FTP user accounts. You cannot delete this group. |
Creating a User Group
- Go to FTP Server > Groups.
The Groups page appears. - Click Create.
The Create FTP User Group window appears.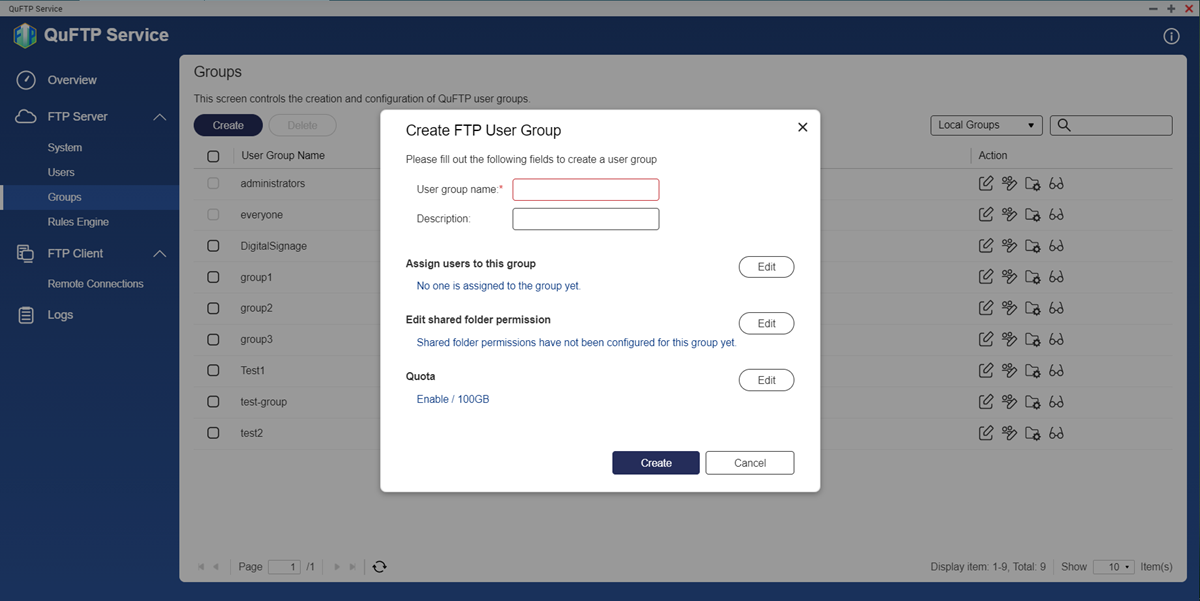
- Specify the User group name.
Name requirements:- Length: 1–128 characters
- Valid characters: A–Z, a–z, 0–9
- Valid multibyte languages: Chinese, Japanese, Korean, Russian
- Valid special characters: Hyphen (-)
- Optional: Specify a description that contains a maximum of 128 characters.
- Optional: Add users to the user group.
- Under Assign users to this group, click Edit.
- Select the permissions for each shared folder.
- Optional: Specify shared folder permissions for the user group.
- Under Edit shared folder permissions, click Edit.
- Select the permissions for each shared folder.
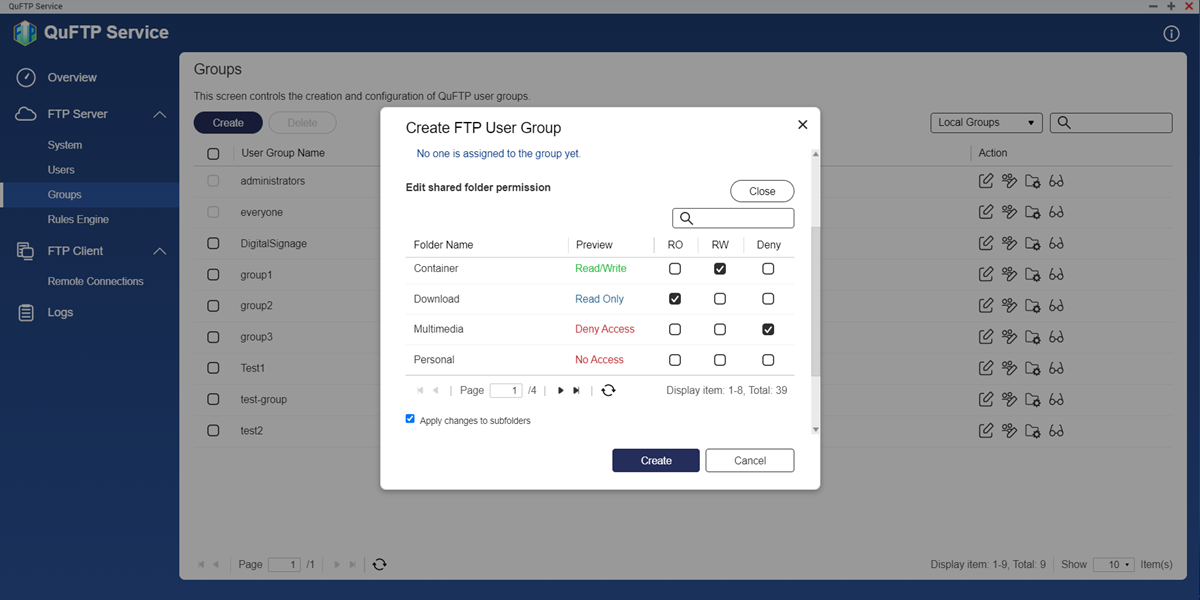
- Click Create.
QuFTP Service creates the user group.
Modifying User Group Settings
- Go to FTP Server > Groups.
The Groups page appears. - Identify a user group.
- Under Action, click
 .
.
The Edit Group Details window appears.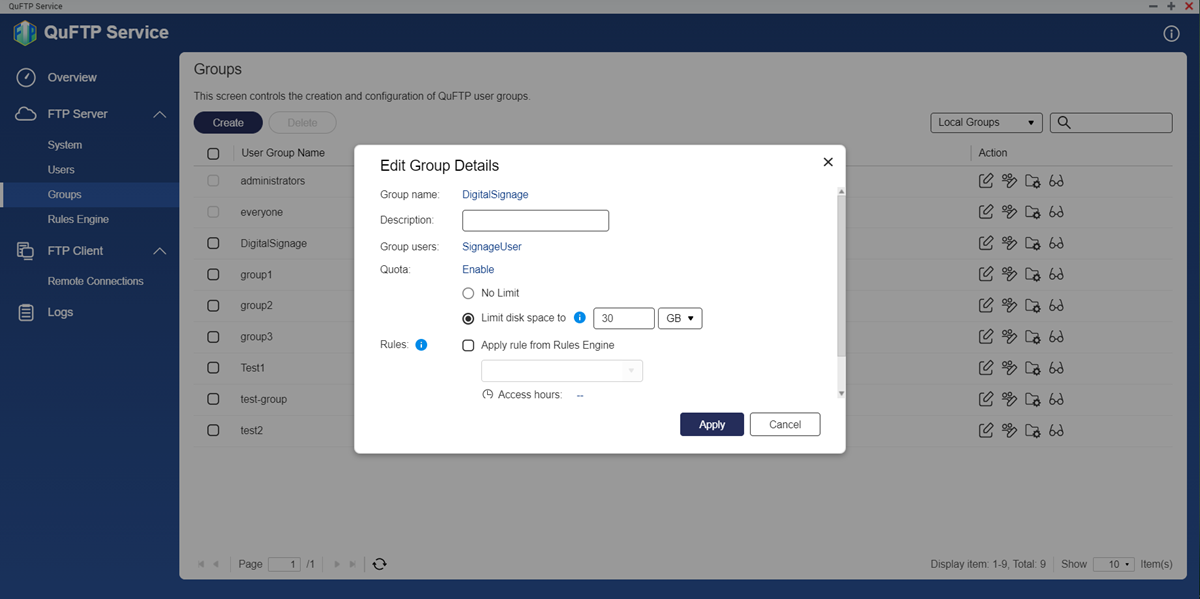
- Specify a description that contains up to 128 characters.
- Assign FTP rules to the user group.
- Enable Apply rule from Rules Engine.
- Select an FTP rule from the drop-down list.NoteTo create a new FTP rule, see Creating an FTP Rule.
- Click Apply.
QuFTP Service updates the user group information.
Adding an FTP User to a User Group
- Go to FTP Server > Groups.
The Groups page appears. - Identify a user group.
- Under Action, click
 .
.
The Edit Group Details window appears.
- Select the FTP users.
- Click Apply.
QuFTP Service adds the selected users to the user group.
Deleting a User Group
- Go to FTP Server > Groups.
The Groups page appears. - Identify a user group.
- Next to the username, click
 .
. - Click Delete.
A confirmation message appears. - Click OK.
QuFTP Service deletes the user group.
Managing Shared Folder Permissions
You can assign permissions to access shared folders for both users and user groups.
| Permission | Description |
|---|---|
| Read Only (RO) | The FTP user or user group can view files in the shared folder. |
| Read/Write (RW) | The FTP user or user group can add, delete, modify, and view files in the shared folder. Note If an FTP user creates a shared link to a folder they no longer have RW permissions to, anyone with that shared link cannot access the folder. |
| Deny | The FTP user or user group cannot access the shared folder. |
| FTP Write-Only | The FTP user or user group can add and overwrite files in the shared folder. View-only access to the folder contents is allowed, and FTP users and user groups are prohibited from reading or editing the file contents. Important
|
Configure shared folder permissions for users and user groups.
| Task | User Action |
|---|---|
| Edit user permissions for the shared folders |
|
| Edit user group permissions for the shared folders |
|
QuFTP Service updates the shared folder permissions.
Managing QuFTP Service Rules
You can configure rules for the FTP server by controlling the times during which the server is accessible, adding digital watermarks to files in a folder, and limiting FTP users access only to the designated root directory.
Creating an FTP Rule
- Go to FTP Server > Rules Engine.
The Rules Engine page appears. - Click Create.
The Create Rule window appears.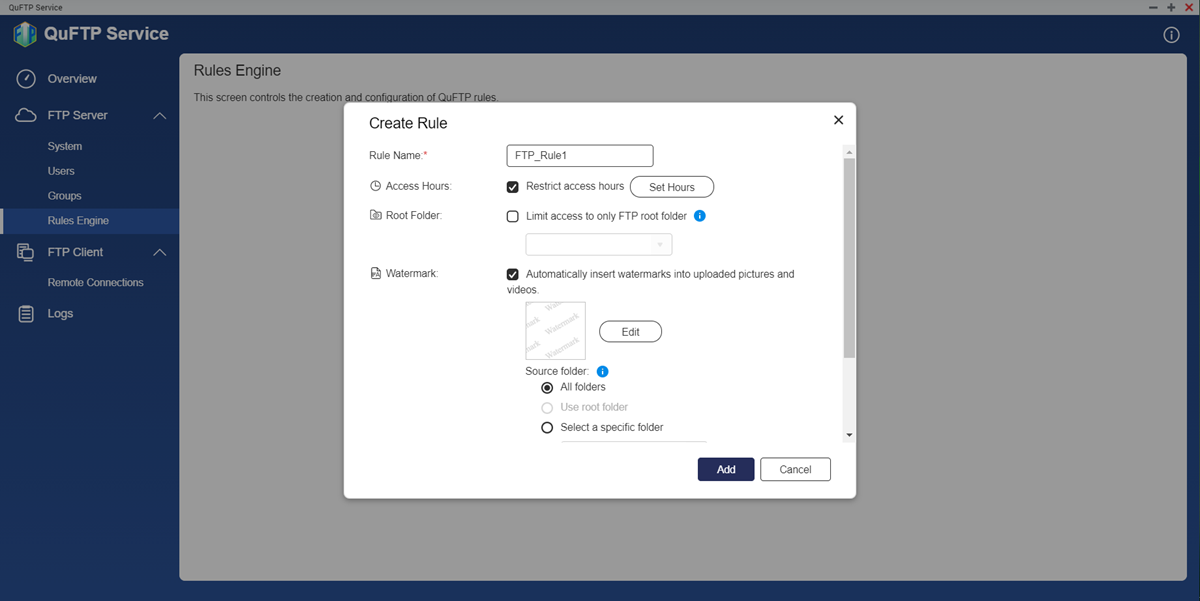
- Specify the FTP rule name.
- Optional: Configure the FTP folder access hours.
- Enable Restrict access hours.
- Click Set Hours to specify a timeframe.
The Access Hours window appears.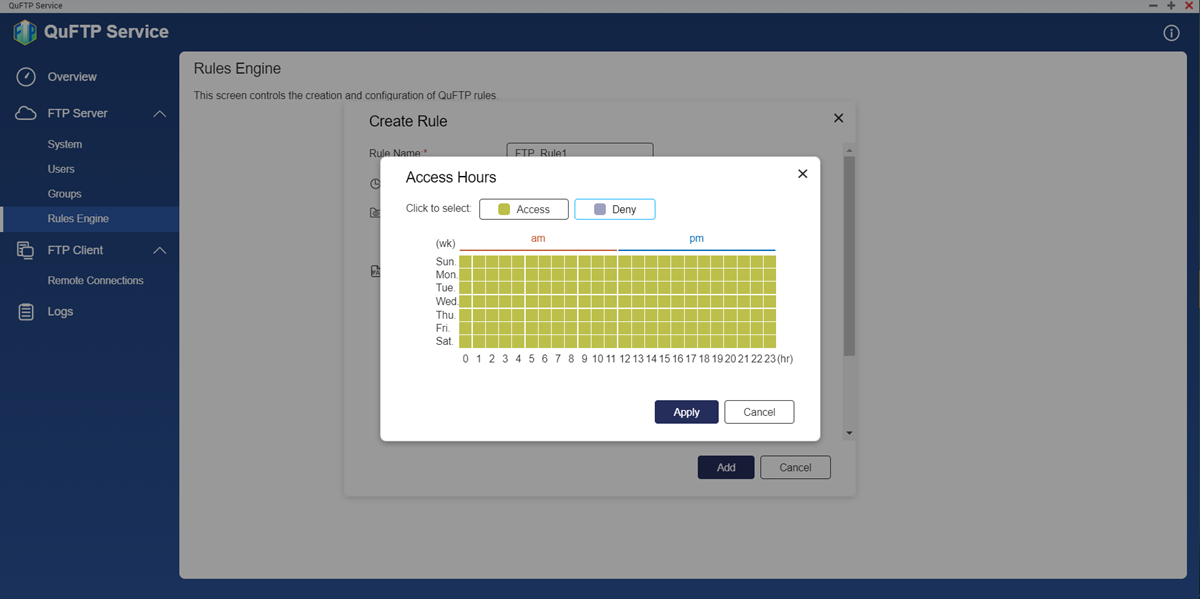
- Select the hours during which the FTP folders are inaccessible.
 : The FTP folders can be accessed by the FTP users.
 : The FTP folders cannot be accessed by the FTP users.
- Click Apply.
QuFTP Service applies the schedule.
- Limit access to an access folder.
- Enable Limit access to only FTP root folder.
- Select the root folders.
- Configure the watermark settings.
- Enable Automatically insert watermarks into uploaded pictures and videos.
You can add digital watermarks to the following file formats.Note- In order to add watermarks to images in QuFTP Service, make sure you have Multimedia Console and Video Station installed and enabled on your device.
- Make sure that transcoding is enabled in Video Station. To enable transcoding, go to Video Station > Transcoding.
File Format Graphics BMP, GIF (non-animated .gif files), JPEG, PNG, TGA, TIFF Media 3GP, ASF, AVI, DIVX, F4V, FLV, INSV, M2T, M2TS, M4V, MKV, MLV, MOD, MOV, MP2V, MP4, MPEG, MPV2, MTS, RM, RMP4, RMVB, TOD, WMV - Click Edit.
The Watermark Settings window appears. - Select a watermark option.
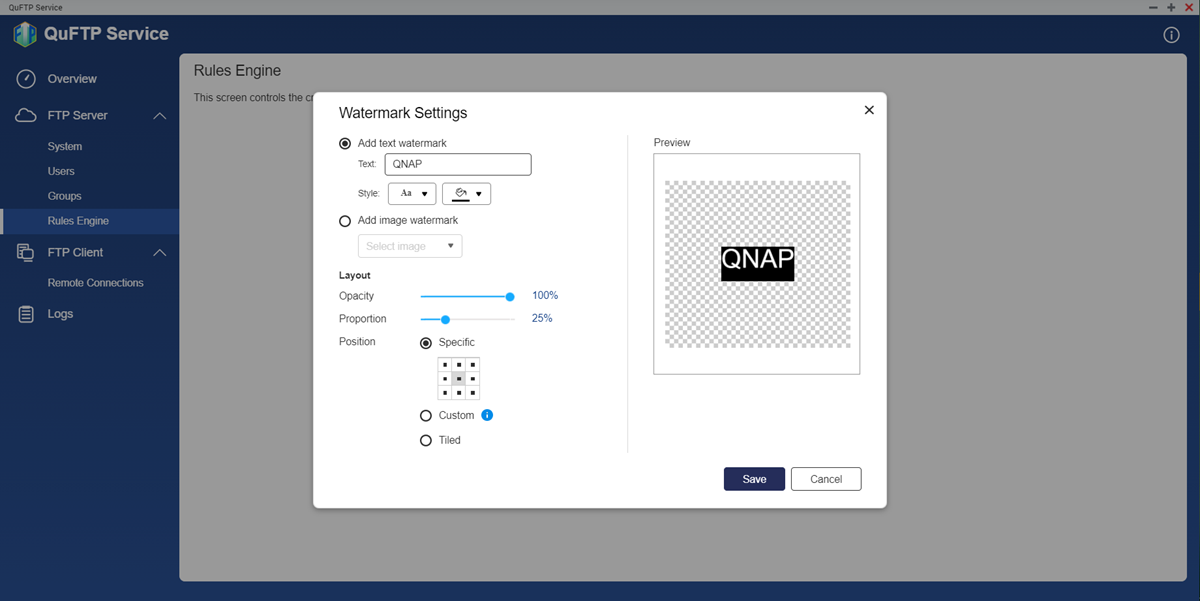
Setting User Action Add text watermark - Specify the watermark text.
- Select the font and background color.
Add image watermark - Click Select image.
- Select from the following:
- From the NAS
- From your computer
- Select the image from the NAS local volume or your computer.
- Click Open.
The image appears on the preview pane.
Important- You can use the following file formats for the digital watermarks: BMP, GIF, JPG, PNG
- Maximum file size: 2 MB
- Adjust the watermark opacity.
- Adjust the watermark proportion.
- Specify the watermark placement.
Setting Description Specific The watermark is placed at one of the pre-defined positions Custom The watermark is dragged and dropped on any location on the file Tiled The watermark is repeated horizontally and vertically - Click Save.
QuFTP Service updates the watermark. - Select the source folder to apply the watermark settings.
- Select the destination folder to apply the migrated watermark settings.
- Enable Automatically insert watermarks into uploaded pictures and videos.
- Click Add.
QuFTP Service creates the FTP rule.
Deleting an FTP Rule
- Go to FTP Server > Rules Engine. The Rules Engine page appears.
- Identify an FTP rule.
- Click
 beside the rule name.
 - Click Delete.
A confirmation message appears. - Click OK.
QuFTP Service deletes the FTP rule.
Setting Rule Priorities
FTP rules are prioritized in the order they are listed; you can change the rule priority by adjusting the order.
- Go to FTP Server > Rules Engine. The Rules Engine page appears.
- Identify an FTP rule.
- Configure the FTP priority.
Setting User Action 
Click to move the rule up in priority. 
Click to move the rule down in priority.
QuFTP Service automatically applies the rule priority.
Managing FTP Remote Connections
QuFTP Service allows system administrators to create and manage FTP directories on remote servers.
Creating an FTP Remote Connection
- Go to FTP Client > Remote Connections.
The Remote Connections page appears. - Click Create.
The Create remote mount window appears.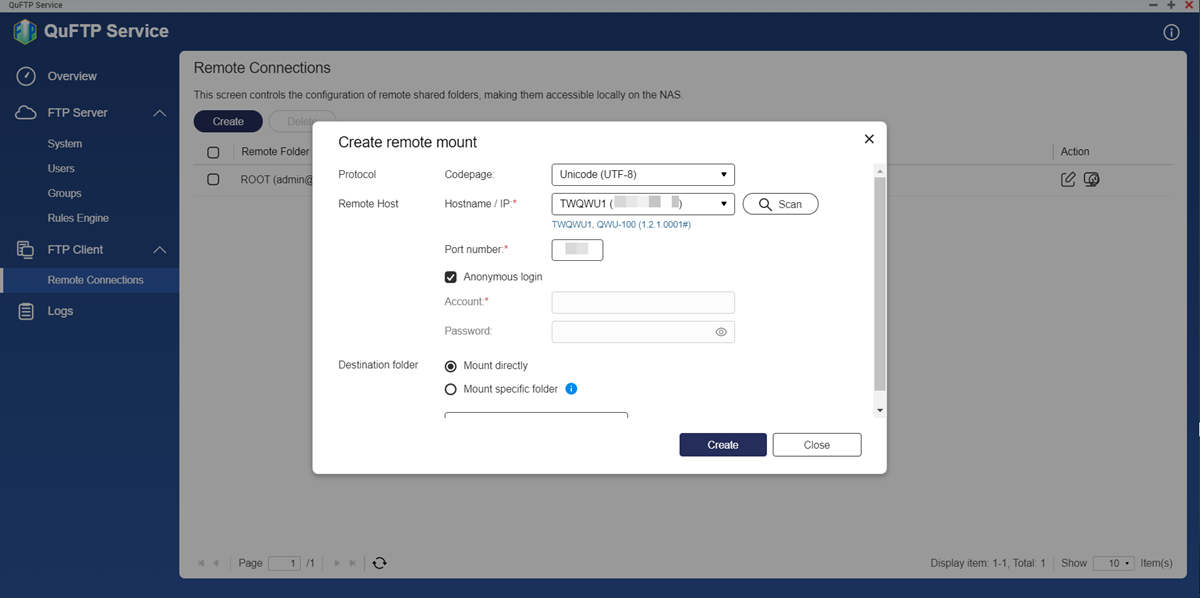
- Specify the character encoding code page.
- Specify a domain name or IP address of the remote host.
- Enter the domain name or IP address.
- Click Scan.
QuFTP Service scans and updates the domain name of the remote host.
- Specify a port number.NoteThe default value of the FTP port is 21.
- Configure login settings.
- Enable Anonymous login.ImportantAnonymous login is available only if the remote host you are accessing has established an anonymous FTP server.
- Specify the username and password of the remote host.
- Enable Anonymous login.
- Configure the destination folder settings.
- Mount directly: Enable to mount the remote host directly on to your FTP server.
- Mount specific folder: Enable to mount the remote host on to a specific folder.
- Specify a remote connection name.
- Click Create.
QuFTP Service creates the remote connection.
Modifying Remote FTP Permissions
- Go to FTP Client > Remote Connections.
The Remote Connections page appears. - Identify a remote connection.
- Click
 .
.
The Edit Remote FTP Permissions window appears. - Add users and user groups.
- Click Add.
The Select users and groups window appears. - Select the type of user or user group from the drop-down list.
- Edit the user's permission.
- Click Add.
The window closes.
- Click Add.
- Edit the guest access permission.
- Edit the access permission of the existing users and groups.
- Click Apply.
QuFTP Service applies the modified settings to the remote connection.
Deleting an FTP Client Remote Connection
- Go to FTP Client > Remote Connections.
The Remote Connections page appears. - Identify a remote connection.
- Next to the username, click
 .NoteSelect one or more remote connections by clicking the checkbox beside the remote folder name.
 - Click Delete.
A confirmation message appears. - Click OK.
QuFTP Service deletes the remote connection.
Monitoring QuFTP Service Settings
QuFTP Service allows you to view online FTP sessions, user and group permissions to monitor folder access, and event logs to diagnose application issues.
Viewing Shared Folder Permissions
You can review folder permissions for specific users or user groups in QuFTP Service.
- Select a user or user group to view the folder access permissions.
- On the left panel, go to FTP Servers > Users.
- On the left panel, go to FTP Servers > Groups.
- Identify a user or user group.
- Click
 .
.
The Folder Access Permissions window appears.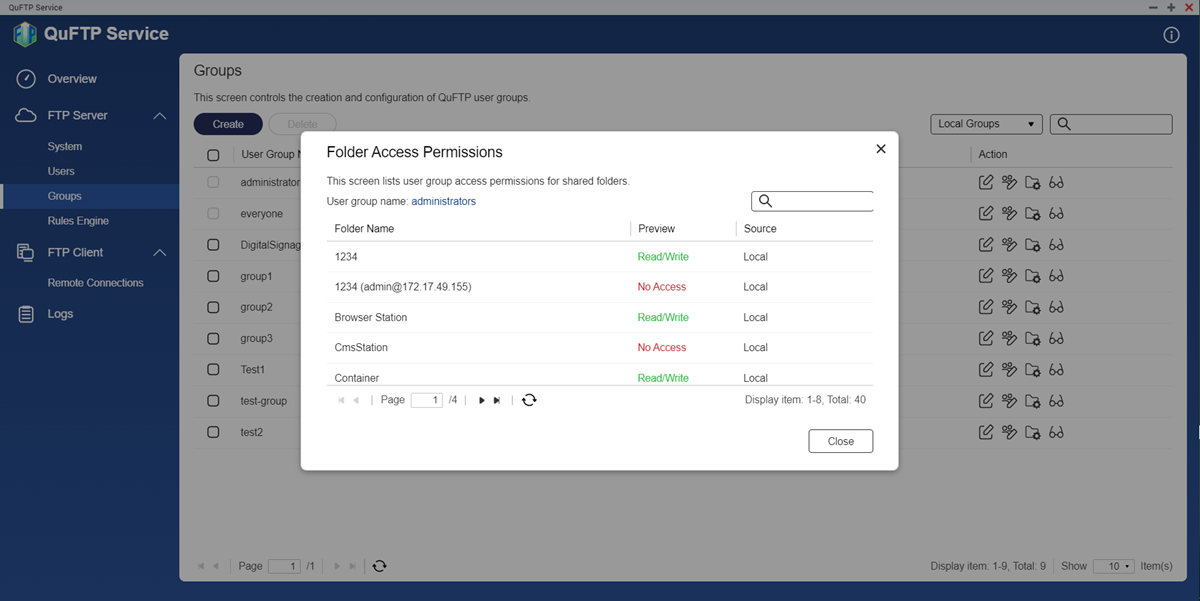 You can review the following information:
- Folder name
- Applied permissions to the folder
- Folder source
- Local volume
- HybridMount
- Click Close.
Viewing the QuFTP Service Information
The QuFTP Service Overview screen shows a dashboard with the online FTP users and their information, the number of online FTP sessions, and the overall data transfer rate.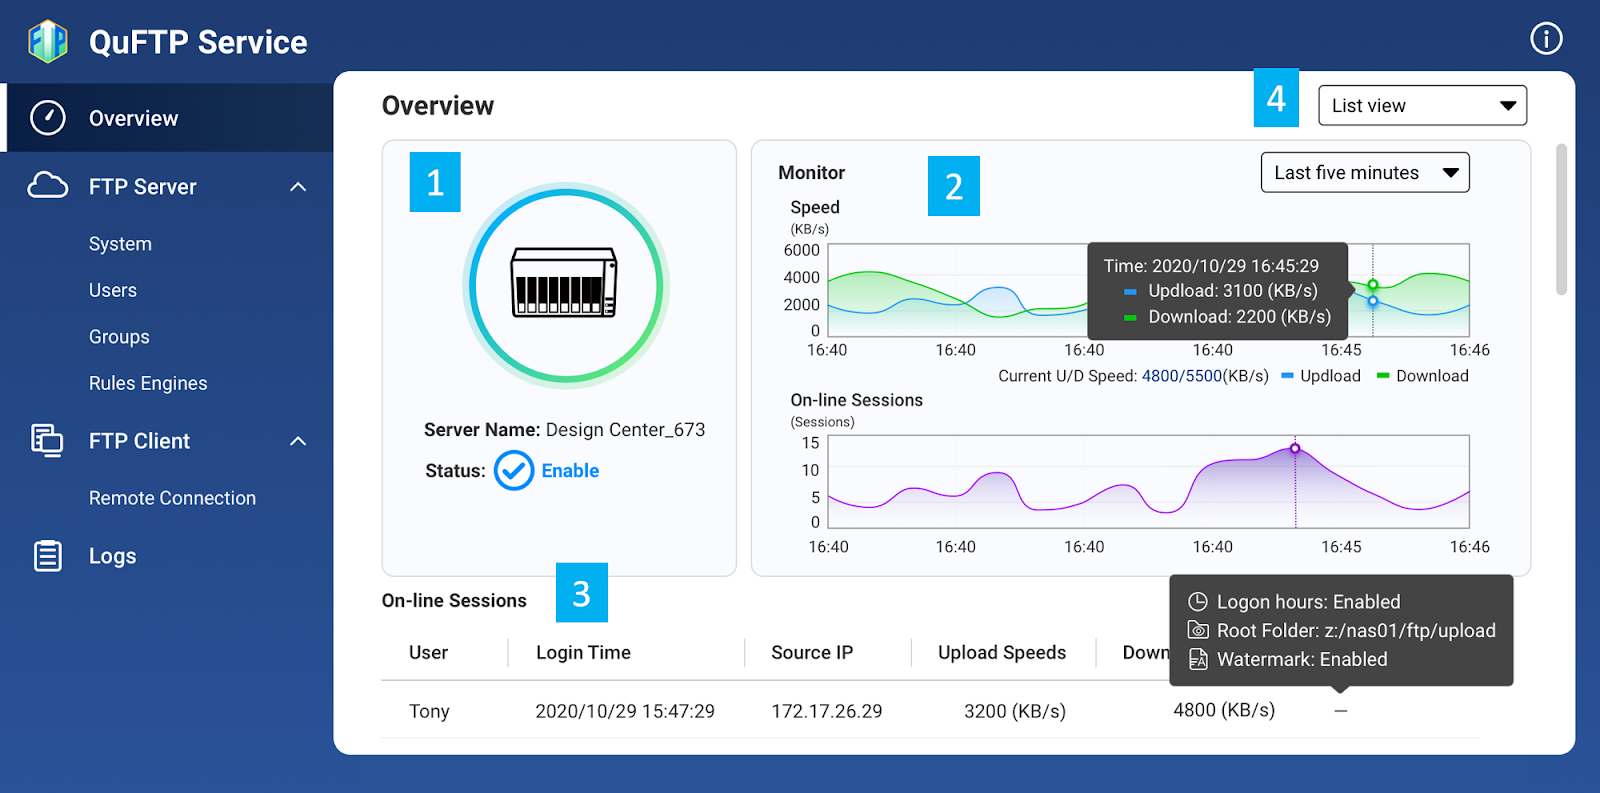
The Overview screen has four main areas.
| Label | Area | Description |
|---|---|---|
| 1 | Server name and status | Displays the NAS name and FTP status. |
| 2 | Monitoring screen | Displays the number of online FTP user sessions and the data transfer rate. |
| 3 | Online sessions | Displays the following information:
Note Depending on the FTP user settings, some fields may be empty. |
| 4 | Viewing mode | Displays the Overview screen in the following modes:
|
Managing Logs
QuFTP Service records actions that are performed inside the application. You can view and filter both application access and event logs.
- Go to Logs.
- Select from the following logs.
- System Event Logs
- System Access Logs
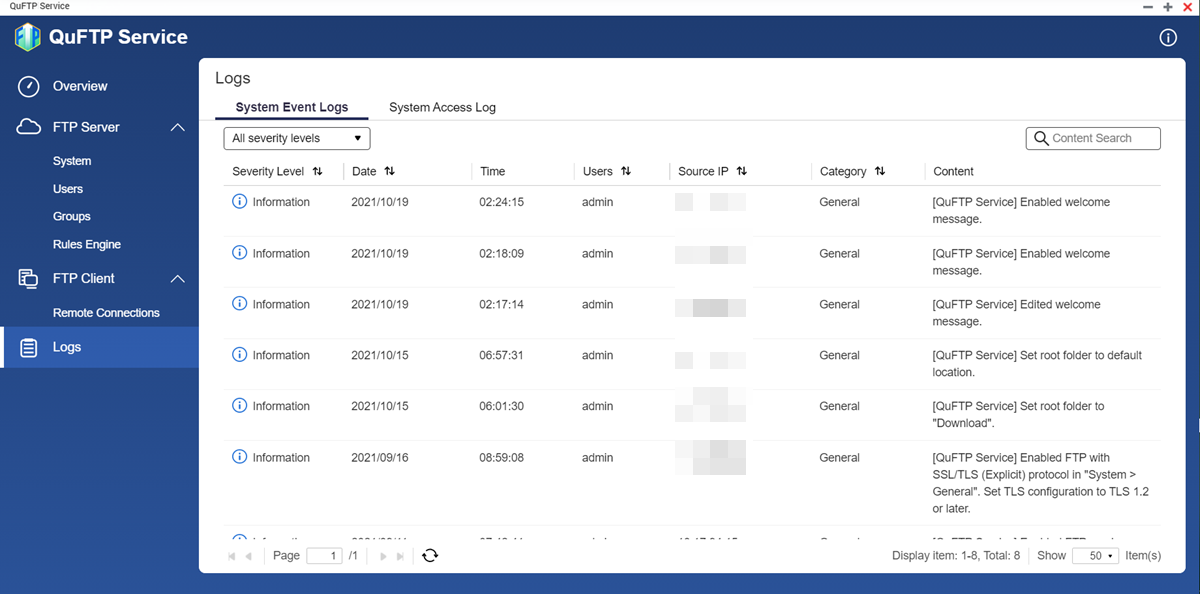
- Perform any of the following tasks.
Task Possible User Actions Filter the logs Click All severity levelsto filter the logs based on the following severity levels: - Information
- Warning
- Error
Search log contents Click Content Searchto enter a specific log keyword. NoteClick to clear the search field contents.
QuFTP Service performs the specified action.


