How to connect a NAS to QuWAN Orchestrator using QuWAN Express and the Super Node Service?
Applicable Products
Software
- QuWAN Orchestrator 2.9 and later versions
- QVPN Service 3.3 and later
Hardware
- All QNAP NAS models
Overview
QuWAN Express allows a QNAP NAS to join the QuWAN network quickly with minimal configuration. It provides secure connectivity for remote access and inter-device communication without requiring manual port forwarding or complicated VPN setup.
When a QNAP router (hub) is available, the NAS automatically establishes an IPSec tunnel with the hub to support secure, high-performance data transfer within the organization.
If a hub is not deployed, you can use the Super Node service. Super Node is a cloud gateway that provides an IPSec tunnel for the NAS, assigns a public IP and port for secure external access, and enables NAS-to-NAS communication inside the QuWAN virtual network.
- Super Node is designed for environments without a QuWAN hub router and supports up to three edge NAS devices for remote access. If additional devices need to connect, you can update the allowed NAS list in the QuWAN Orchestrator cloud platform.
- The service includes a monthly free data transmission limit of 15 GB. After this limit is reached, transmission speed is reduced, and you can upgrade your license plan in the QNAP Software Store if more capacity is needed.
Key features
- QuWAN Express allows you to join the QuWAN network with a single click in QVPN Service, and the system automatically handles network configuration on your behalf.
- It enables secure remote access to NAS data from any location by routing traffic through the QuWAN overlay network.
- The Super Node service provides cloud-based connectivity that ensures reliable external access and seamless communication between NAS devices, even when a hub router is unavailable.
- The service assigns a virtual IP address to the NAS so it can communicate with other QuWAN devices without exposing internal network details.
Prerequisites
- Update the NAS firmware and QVPN Service to the versions listed in Applicable Products.
- Ensure the NAS has an active internet connection.
- Disable the L2TP/IPSec server on the NAS before enabling QuWAN Express.
- Sign in to the NAS with a QNAP ID so it can register with QuWAN Orchestrator.
- Make sure the hub router you plan to use supports QuWAN configuration and is registered to the same QuWAN organization that you will select when configuring the QuWAN Express settings.
Procedure
This section describes how to configure access QuWAN Express on QVPN Service, configure device information, and register the NAS as an edge device in QuWAN Orchestrator.
Configure QuWAN Express on your QNAP NAS
- Log in to your NAS as an administrator.
- Open QVPN Service.
- Go to QuWAN > QuWAN Express.
- Click Join.
- Click Start to run prerequisite checks.
QVPN Service verifies the following:- The NAS must have an active internet connection for the check to pass.
- The check confirms whether the L2TP/IPSec server is disabled because it must be turned off before you continue.
- The check verifies that the NAS is signed in with a QNAP ID and prompts you to log in when necessary.
- Optional: Configure the QuWAN organization and region settings.
- Click
 .
.
The Edit Device Information window appears.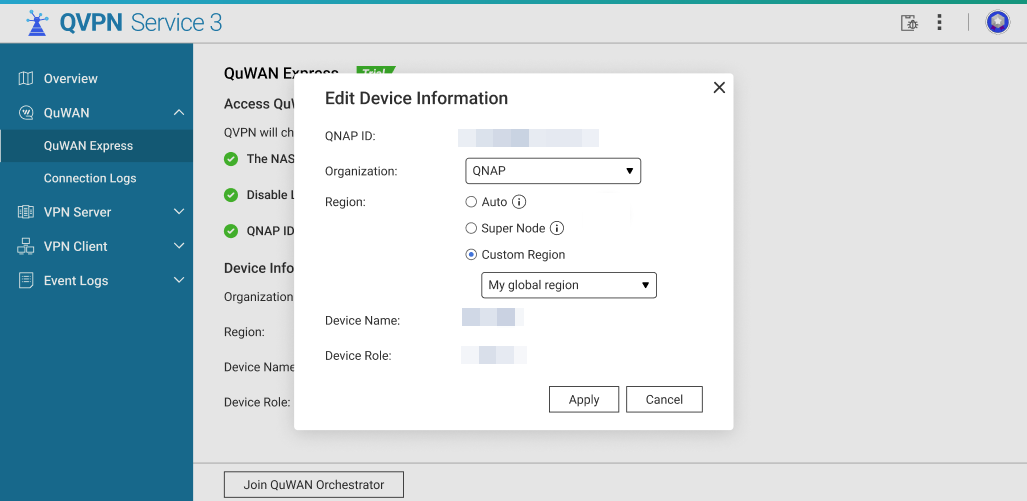
- Optional: Select the QuWAN Organization from the dropdown.
If your QNAP ID is a member of multiple organizations, select the organization that will manage this NAS. - Optional: Select an option to determine the region where the NAS establishes its QuWAN connection:
- Auto (Recommended): QVPN Service automatically chooses the best region. It prioritizes regions where a hub router exists for your organization. If a hub is unavailable, it falls back to a Super Node region.
- Super Node: Force connection to the QuWAN Super Node cloud endpoint.NoteUse when there is no hub in your organization or when you want immediate cloud endpoint access. When using Super Node, the NAS receives a cloud-assigned public IP and port for external connectivity without port forwarding.
- Custom Region: Manually select a region when you want the NAS to join a particular segment of your QuWAN organization.
- Click Apply.
QVPN Service updates the device registration settings locally and prepares to register the device with QuWAN Orchestrator.
- Click
- Click Join QuWAN Orchestrator.
The NAS is registered to QuWAN Orchestrator and becomes an edge NAS.
Once the NAS successfully joins the QuWAN organization, the following actions occur automatically:- The QuWAN Orchestrator assigns a Virtual IP address to the NAS inside the QuWAN overlay network.
- If a hub router exists in the assigned region, the NAS will automatically establish an IPSec tunnel with that hub.
- If connected to a Super Node, the NAS will receive a public IP address and port assigned by the cloud endpoint enabling secure external access without manual port forwarding.
- Wait until the connection status updates to Connected on the QuWAN Express page.
Once connected the NAS is reachable via the QuWAN virtual network by other edge devices and by users who have appropriate QuWAN access (for example, remote clients or other NAS devices).
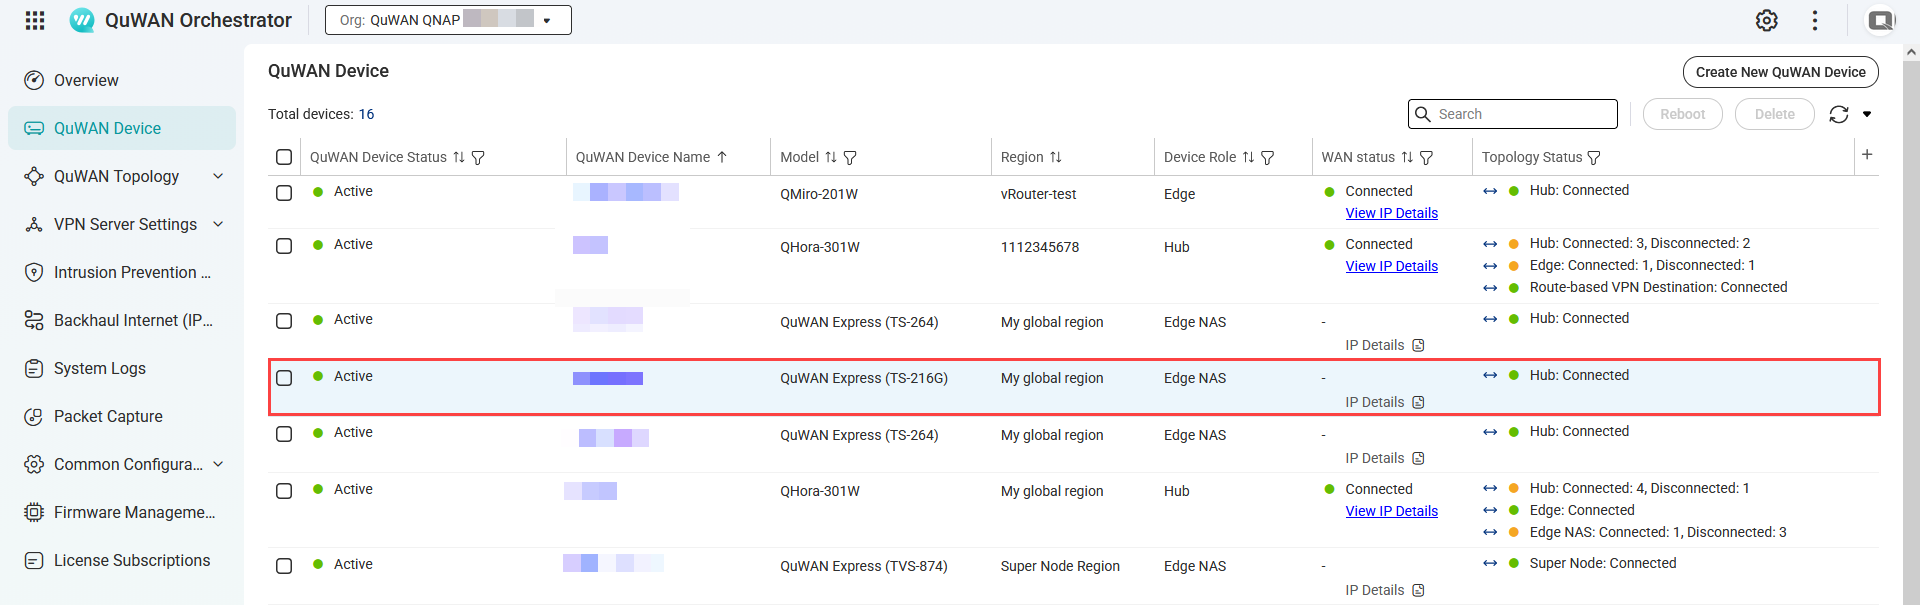
- Optional: Verify the NAS appears in QuWAN Orchestrator.
- Log into QuWAN Orchestrator.
- Select your organization.
- Go to QuWAN Device.
- Locate the NAS by the device name.
- Under Topology Status, check if the status is Connected.
Manage Super Node connections
- Log in to QuWAN Orchestrator.
- Select your organization.
- Go to QuWAN Topology > Super Node (QuWAN Express) > Status.
- Click Manage Super Node Connections.
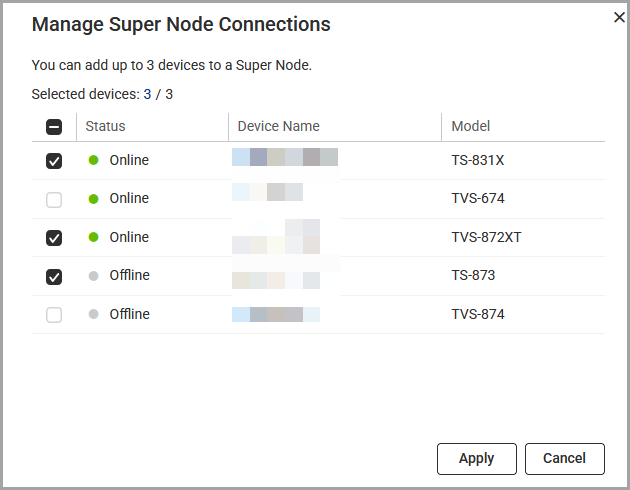
- Select between 1 to 3 edge NAS devices.
- Click Apply.
QuWAN Orchestrator updates the Super Node connections.
Modifying the virtual IP address of the edge NAS
- Log in to your edge NAS.
- Open QVPN Service.
- Go to QuWAN > QuWAN Express.
- Click
 .
.
The Edit Virtual IP window appears. - Enter a different virtual IP address.
- Click Check.
QVPN Service checks the virtual IP address. - Click Apply.
Accessing the NAS remotely via QuWAN Express
- From another QuWAN edge device or routed network, use the assigned Virtual IP address to connect to services on the NAS (e.g., SMB, AFP, HTTP(S), SSH) depending on your NAS access rules and port configuration.
- When using a hub, traffic between NAS and hub-connected devices remains within the IPSec tunnels and private networks, providing lower latency and better throughput for in-organization transfers.
Troubleshooting
- Network connection check failed
- Verify that the NAS has a working internet connection.
- Make sure the DNS settings are correct, because incorrect DNS configuration can cause the NAS to appear offline to QuWAN services.
- L2TP/IPSec conflict check failed
- Disable any local L2TP/IPSec server instance in QVPN Service before activating QuWAN Express, since both services cannot run simultaneously.
- QNAP ID verification failed
- Log in with a QNAP ID that belongs to the organization you want to use, then try joining again. Also confirm that the NAS system date and time are accurate so the authentication tokens can be validated.
- Edge shows "Connecting" but never "Connected"
- Verify that the NAS and the router have working internet connections.
- Check the firewall rules on both your network and the NAS. IPSec and NAT traversal ports, such as UDP 500 and 4500, must be allowed for outbound traffic.


