-
What is Virtualization Station?
-
Operating systems supported by Virtualization Station
-
Use cases for Virtualization Station
-
-
System requirements
-
Before you start
-
Configure and manage virtual appliances and virtual machines
-
Create a virtual machine
-
Create a virtual appliance from VM Marketplace
-
-
Manage VM actions
-
VM lifecycle management
-
VM configuration and management
-
VM interaction
-
-
Add hardware devices to a VM
-
Configure and manage VM snapshots
-
Configure and manage VM data protection plans
-
Configure application preferences
-
Further reading and resources
This guide is applicable to QTS 5.1.0 and QuTS hero h5.1.0 and later versions.
What is Virtualization Station?
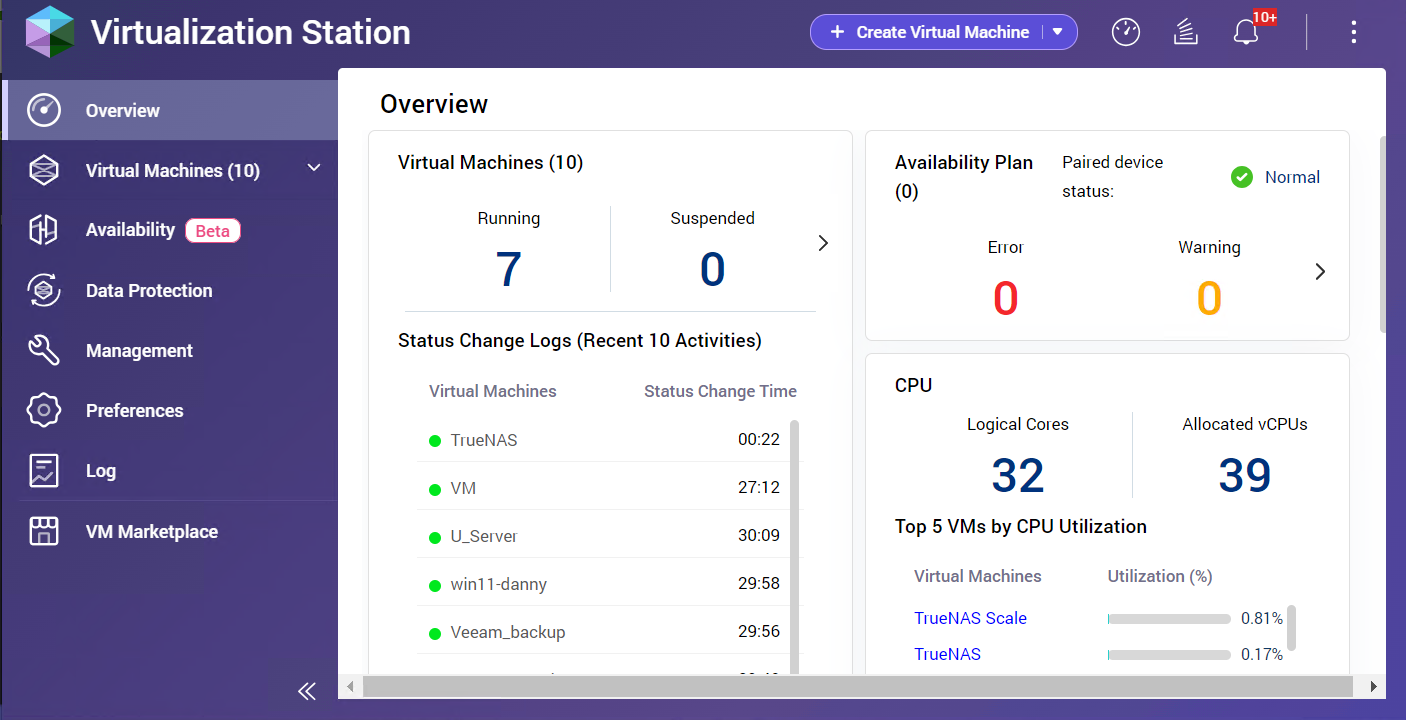
Virtualization Station is a virtualization software platform that allows you to create and manage multiple virtual machines on your QNAP NAS and QuCPE devices. The application offers a wide range of capabilities, including VM creation, management, and migration. By consolidating multiple workloads onto a single physical server, Virtualization Station can improve resource utilization, enhance flexibility, and ensure business continuity. Virtualization Station provides a secure and scalable environment for deploying and managing various virtual applications.
Operating systems supported by Virtualization Station
Virtualization Station offers comprehensive compatibility with a diverse array of operating systems, spanning Windows, Linux, and UNIX platforms. For details, see What operating systems can I deploy in Virtualization Station.
Use cases for Virtualization Station
- Testing and development: Create isolated environments for testing new applications or software updates without affecting the production environment.
- Server consolidation: Reduce the number of physical servers and simplify IT infrastructure management.
- Cloud computing: Build private cloud environments to host applications and services.
- Education and training: Provide students with virtual lab environments for hands-on learning.
System requirements
| Requirement | Details |
|---|---|
| Model | x86-based NAS models |
| CPU |
|
| Memory |
|
| Virtual switch | An existing virtual switch is required. For details on creating a new virtual switch, see How to use and set up Network and Virtual Switch. |
Before you start
- Log in to the device as an administrator.
- Ensure that Virtualization Station is installed.
- Ensure that your device is connected to an external network using a default gateway.
- Ensure that your device firmware is up to date.
Configure and manage virtual appliances and virtual machines
This section provides an overview of virtual appliances (VAs) and virtual machines (VMs), including their definitions and key differences.
- VA (Virtual Appliance): A pre-configured virtual machine that comes bundled with a specific software application or operating system. VAs are typically ready-to-use and simplify the deployment of complex applications.
- VM (Virtual Machine): A software emulation of a physical computer system. VMs run within a host operating system and can be customized to meet specific requirements. VMs offer greater flexibility compared to VAs but may require more configuration.
The maximum number of virtual machines allowed in Virtualization Station depends on the hardware resources of your physical server. Factors such as CPU cores, RAM, and storage space will determine the number of VMs you can run simultaneously.
Key differences
- Customization: VMs offer more customization options than VAs, allowing you to tailor the hardware and software configuration to your specific needs.
- Deployment: VAs are typically pre-configured and easier to deploy, while VMs may require more configuration before they can be used.
- Flexibility: VMs provide greater flexibility in terms of resource allocation and management compared to VAs.
Create a virtual machine
- Log in to your QNAP device and open Virtualization Station.
- Click Create Virtual Machine
The Create a New Virtual Machine window opens. - Configure the general settings.
- Configure the VM settings.
 NoteCustomize the VM settings to your specific needs by selecting either basic or advanced options. To access advanced settings, click
in the configuration window. - Review the VM settings and click Create.
For details, see the VM and VA Creation topic in the Virtualization Station tutorial.
Create a virtual appliance from VM Marketplace
- Log in to your QNAP device and open Virtualization Station.
- Go to VM Marketplace.
- Select a VA.
- Click Deploy.
- Configure the advanced VM settings.
- Review and create the virtual appliance.
For details, see the Deploying a Virtual Appliance from the VM Marketplace topic in the Virtualization Station tutorial.
Manage VM actions
You can efficiently manage your virtual machines by performing key actions such as starting, stopping, cloning, and other essential tasks.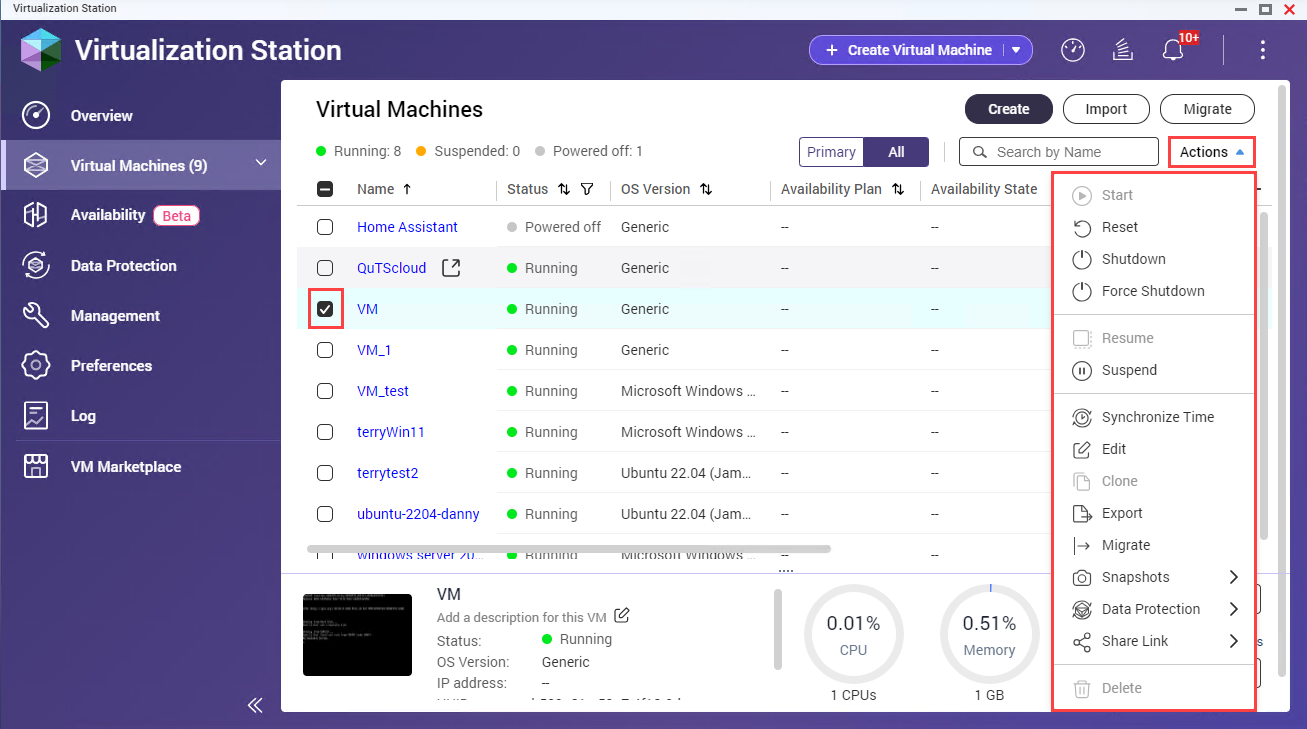
VM lifecycle management
| Action | Description |
|---|---|
| Start | Power on a VM and begin its operation. |
| Suspend | Temporarily pause a VM's operation, preserving its current state. |
| Resume | Continue the operation of a suspended VM from its saved state. |
| Shut down | Gracefully shut down a VM, allowing it to save its state before powering off. |
| Force shutdown | Immediately power off a VM without waiting for the shutdown process. |
| Reset | Restart a VM without saving its current state. |
VM configuration and management
| Action | Description |
|---|---|
| Import | Import a VM configuration file (OVF/OVA) into Virtualization Station. |
| Export | Export a VM as an OVF/OVA file for backup or transfer to another environment. |
| Clone | Create a duplicate of a VM, preserving its configuration and data. |
| Migrate | Move a VM from one host to another within the Virtualization Station environment. |
| Share | Make a VM accessible to other users within the Virtualization Station environment. |
| Delete | Permanently remove a VM and its associated data from Virtualization Station. |
VM interaction
| Action | Description |
|---|---|
| Access VM console | Connect to the virtual console of a VM to interact with its operating system. |
| Synchronize time | Adjust the time on a VM to match the host system's time. |
| Share links | Generate shareable links for virtual machines, enabling easy access and collaboration with others. |
For details, see the VM Actions topic in the Virtualization Station tutorial.
Add hardware devices to a VM
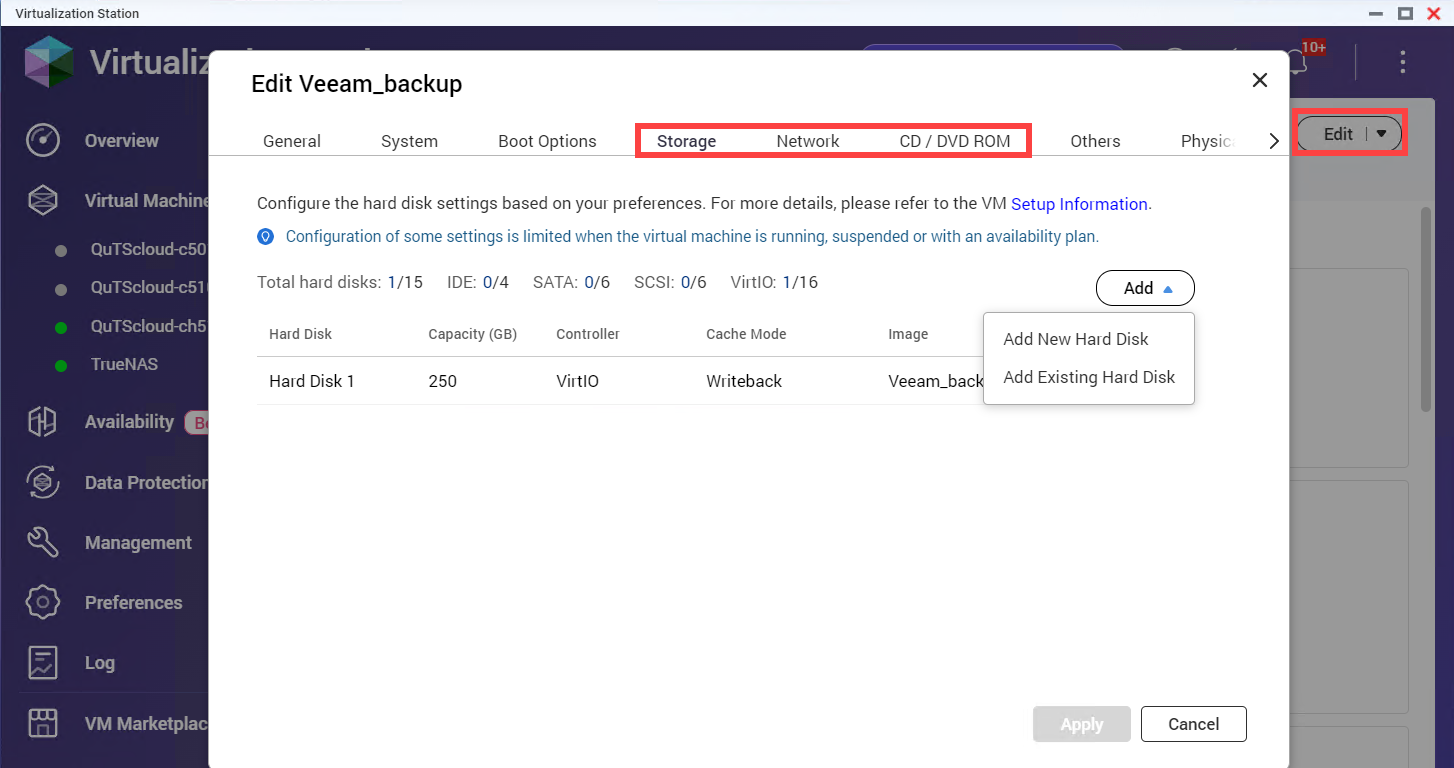
You can enhance the functionality of your virtual machines by adding various hardware devices. Follow these steps to add storage, network devices, or other components to your VM.
- Log in to your QNAP device and open Virtualization Station.
- Go to Virtual Machines.
- Select a running or powered off VM.NoteYou can only add VirtIO devices to running VMs.
The VM Information screen appears.
- Go to Edit.
The Edit [Virtual Machine] window appears.
- Click Storage, Network, or CD/DVD ROM.
- Configure the hardware settings as needed.
- Click Save to apply the changes.
For details, see the Adding Hardware Devices to a VM topic in the Virtualization Station tutorial.
Configure and manage VM snapshots
Virtualization Station allows you to protect your virtual machines by creating and managing snapshots, enabling you to revert to a previous state when needed. Follow these steps to configure and manage VM data protection plans.
- Log in to your QNAP device and open Virtualization Station.
- Go to Virtual Machines.
- Select a VM.
The Information page appears.
- Go to Snapshots.
- Configure and manage VM snapshots.
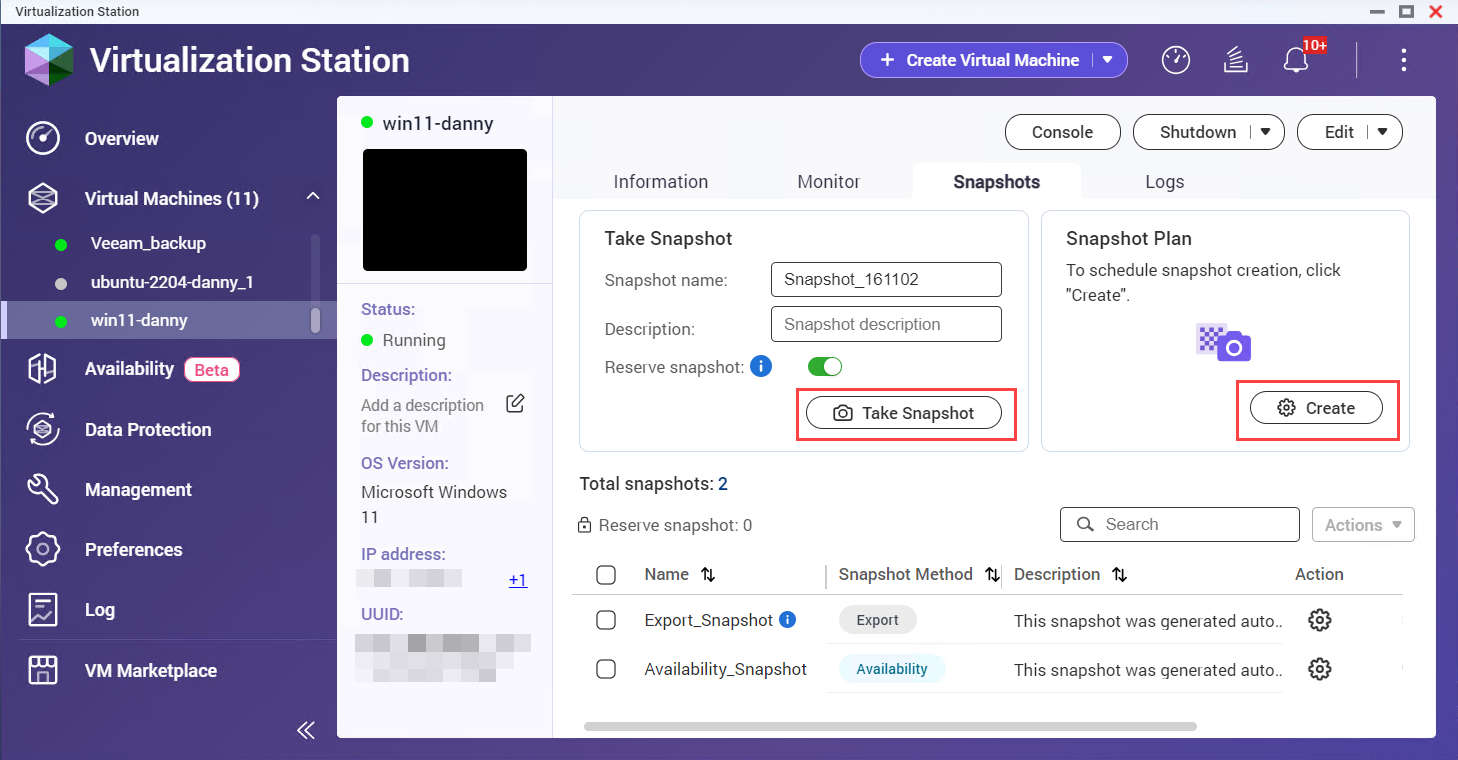
Task Description Manage VM snapshots Capture and manage the current state of a virtual machine for future recovery or rollback. Take a VM snapshot Create a snapshot to save the current state of the virtual machine. Perform snapshot actions Perform actions such as deleting or cloning a snapshot to manage VM versions and backups. Revert a VM snapshot Restore the virtual machine to a previously saved state using a specific snapshot.
For details, see the VM Snapshot Management topic in the Virtualization Station tutorial.
Configure and manage VM data protection plans
Virtualization Station provides options for safeguarding your virtual machines through snapshots and backups. These two strategies ensure effective VM data protection and disaster recovery.
- Log in to your QNAP device and open Virtualization Station.
- Click Data Protection.
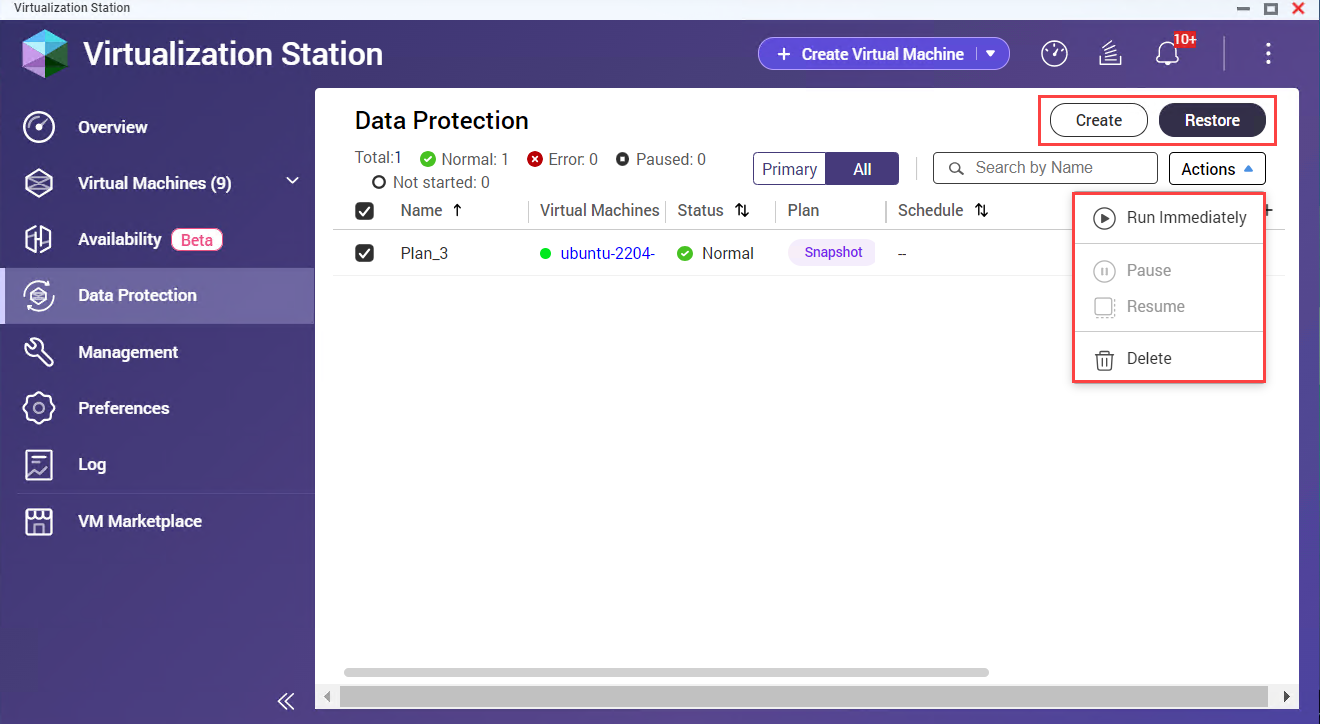
- Perform any of the following tasks.
| Task | Description |
|---|---|
| Create a backup data protection plan | Set up a backup schedule to regularly save your VM data to ensure it can be restored in case of data loss. |
| Create a snapshot data protection plan | Configure snapshots to capture the current state of your VM at specific intervals for quick restoration. |
| Restore a VM using a backup file | Use a previously created backup file to restore your VM to a specific point in time. |
| Manage data protection plans | Monitor, update, and manage your backup and snapshot plans to ensure ongoing data protection and recovery capabilities. |
For details, see the VM Data Protection Plans topic in the Virtualization Station tutorial.
Configure application preferences
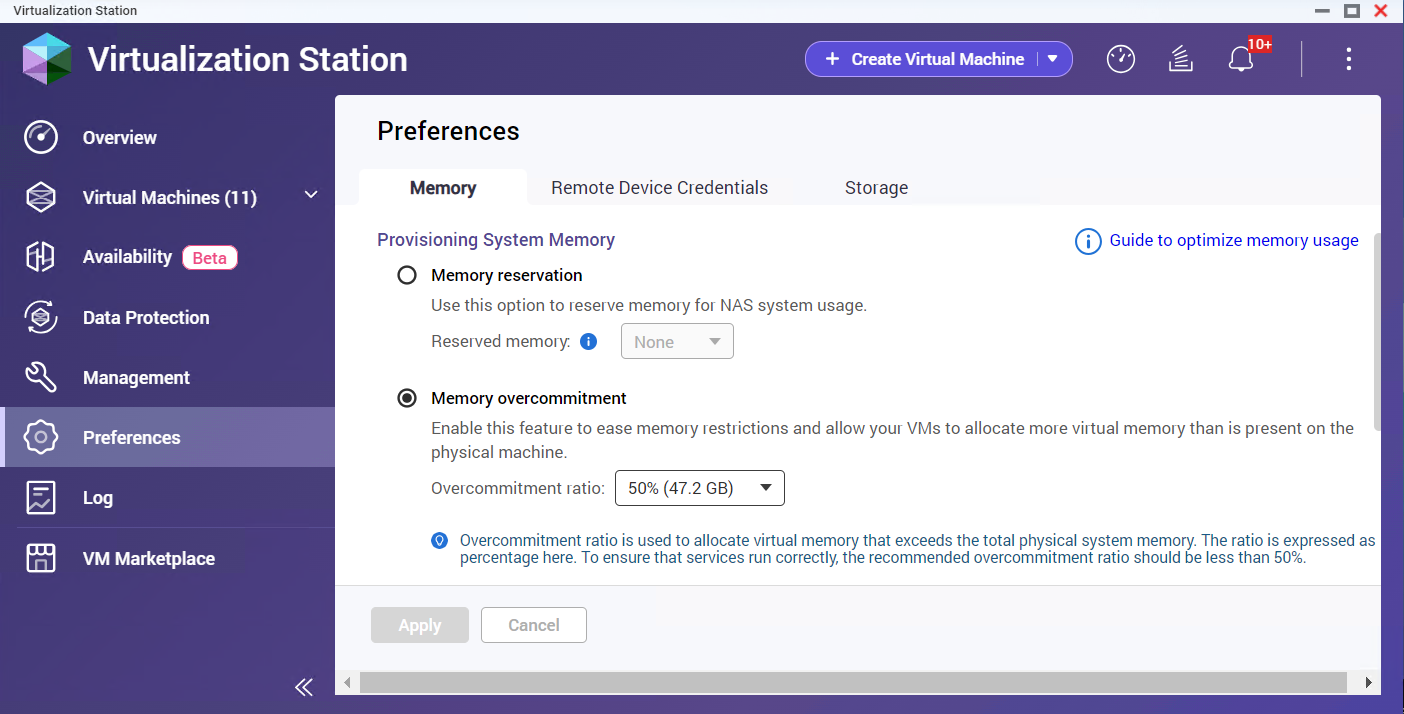
To tailor Virtualization Station to your needs, you can configure various application preferences including memory settings, remote device credentials, and port and storage options. Follow the steps below to adjust these settings:
- Log in to a QNAP device and open Virtualization Station.
- Click Preferences.
Configuration Steps Memory preferences - Select the Memory tab.
- Configure the memory settings.
Remote device credentials - Select the Remote Devices tab.
- In the Remote Devices tab, add, edit, or delete remote device credentials.
Port and storage preferences - Select the Ports and Storage tab.
- Specify the service port numbers and select the VM storage locations.
- Save the VM preferences.
For details, see the Application Preferences topic in the Virtualization Station tutorial.
Further reading and resources
- Virtualization Station: Official QNAP landing page for Virtualization Station
- How to use Virtualization Station 4: A detailed QNAP tutorial for configuring Virtualization Station
- Knowledge Base: Searchable database of FAQs, tutorials, and web helps
- QNAP College: Instructional video tutorials


