How to manually add my NAS IP address in Qfinder Pro?
Applicable Products
Qfinder Pro, QTS, QuTS hero
Scenario
You are unable to detect your QNAP NAS using Qfinder Pro, even though the NAS is powered on and connected to the network.
Root Cause
Qfinder Pro may fail to detect the NAS if your NAS and PC are connected to different subnets. This is common in office networks, dual-router setups, or when you use VLANs. Since Qfinder Pro uses broadcast packets, it can only discover NAS devices on the same subnet as your computer.
For example:
NAS IP Address: 10.0.0.100
PC IP Address: 192.168.1.50
In this case, the NAS won’t appear in Qfinder Pro automatically. You will need to manually add your NAS IP address to Qfinder Pro.
Solution
If you know the IP address of the NAS (for example, obtained from your router or DHCP server), you can manually add it to Qfinder Pro.
Identify the NAS IP address:
If your NAS is connected to a monitor and keyboard, log in locally to find the IP address.
Alternatively, check your router's DHCP client list for the assigned NAS IP.
Open Qfinder Pro on your PC.
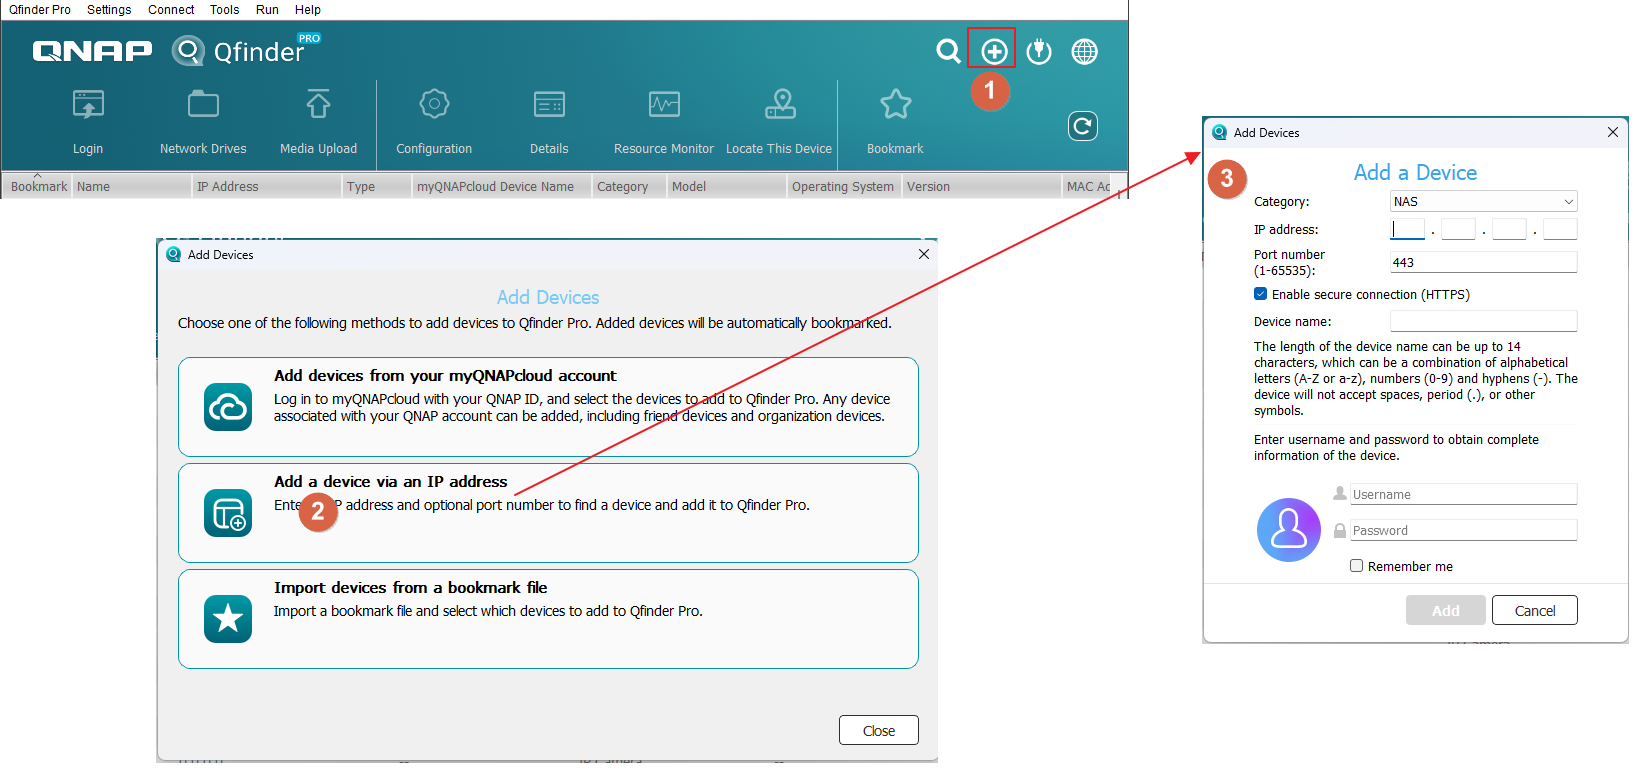
Click the + (Add Device) icon or go to Tools > Add Device Manually.
In the Add a Device window (see the image below), specify the following information.
Category: Select
NAS.IP address: Enter your NAS IP address (e.g.,
10.0.0.100).Port number: Keep the default
443if HTTPS is enabled, otherwise use8080for HTTP.(Optional) Check Enable secure connection (HTTPS) if your NAS uses HTTPS.
(Optional) You may enter a device name, username, and password if you want to connect immediately.
Click Add.
Qfinder Pro will now display the NAS in the list. You can proceed with setup or login.

- Make sure your NAS and PC can ping each other across subnets.
- If you are not sure about the NAS IP address, check your router's DHCP client list or use QNAP’s cloud-based myQNAPcloud service.
- You may also temporarily connect the NAS and PC to the same network to simplify the setup.


