Installing a Virtual Machine with VM Installer


Last modified date: 2020-01-03

Introduction

This tutorial explains how to use VM Installer to install a software router or virtual firewall on your QNAP switch. Virtual machines such as pfSense, RouterOS, and openWRT allow you to add additional functionality to your QNAP device and expand the number of available services.

This tutorial describes the process of installing pfSense. You can use this tutorial as a guide when installing other virtual machines. For more information, see the VM Installer User Guide.


Installing VM Installer

Important:

Virtualization Station must be installed before you can complete these steps.

  1. Log in to QTS.
  2. Open App Center.

    The App Center window opens.

  3. Locate VM Installer.
  4. Click Install.

QTS installs VM Installer.

Installing pfSense with VM Installer

  1. Open VM Installer.
    Important:

    QNAP strongly recommends connecting the QGD-1600P to the host device via the RJ45 host interface port before proceeding in order to prevent any network connection interruptions during VM installation.

  2. Click Start.
  3. Select pfSense.
  4. Specify a VM location and name.

    Field

    Description

    VM location

    The location to install the virtual machine.

    1. Click Browse.

      The Select Folder window opens.

    2. Select a destination folder.

    3. Click Apply.

      The Select Folder window closes.

    VM name

    The name used to identify the virtual machine.

    Requirements:

    • Length: 3–20 characters

    • Valid characters: A–Z, a–z, 0–9

    • Not allowed: \*=+[]\|;:'",<>/?%

  5. Click Next.
  6. Configure the WAN settings.
    1. Enter a virtual switch name.

      Requirements:

      • Length: 3–20 characters

      • Valid characters: A–Z, a–z, 0–9

      • Not allowed: \*=+[]\|;:'",<>/?%

    2. Select an available port.
  7. Optional: Add additional WANs.
    Tip:

    A virtual machine can support a maximum of four WANs.

    1. Click .

      VM Installer creates a new WAN.

    2. Enter a virtual switch name.

      Requirements:

      • Length: 3–20 characters

      • Valid characters: A–Z, a–z, 0–9

      • Not allowed: \*=+[]\|;:'",<>/?%

    3. Select an available port.
  8. Click Next.
  9. Review the settings.
  10. Click Apply.

VM Installer installs the virtual machine.

Configuring pfSense in Virtualization Station

  1. Open Virtualization Station.
  2. Locate the installed pfSense virtual machine.
  3. Double-click the cmd window.
  4. Make any configuration changes to the virtual machine.

Accessing the pfSense WebGUI

  1. Connect to the port selected during installation.
  2. Go to https://192.168.1.1/.
  3. Enter the default account credentials.

    Field

    Value

    Username

    admin

    Password

    pfsense

  4. Click Sign In.

Purchasing a pfSense Support License

Important:
  • This license is non-transferable.

  • Only one license can be activated per QNAP NAS.

  1. Log in to the QNAP license store.
    1. Go to https://license.qnap.com/.
    2. Click Sign in.
    3. Enter your account credentials.
    4. Click Sign in.
  2. Go to the Netgate pfSense Support license page.
  3. Select an appropriate coverage item.
  4. Complete payment following the on-screen directions.

Creating a pfSense Support Ticket

  1. Identify the pfSense License ID.
    1. Log in to QTS.
    2. Go to Control Panel > System > License Center.

      The License Center window opens.

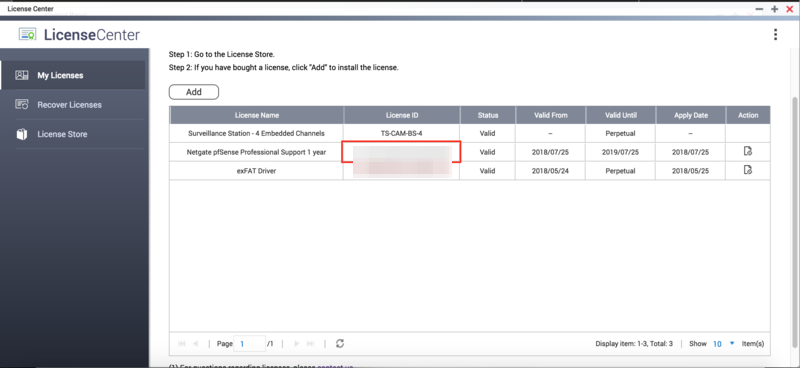
    3. Locate the pfSense License ID.
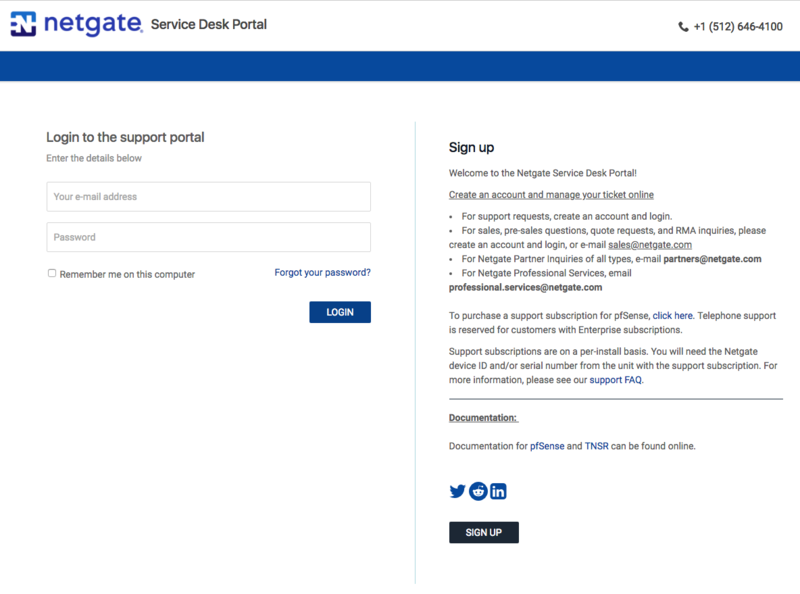
  2. Log in to the Netgate Service Desk Portal.
    1. Go to https://go.netgate.com/support/login.
    2. Enter the account credentials.
    3. Click Login.

      The Service Desk Portal window opens.

  3. Click Open a Ticket.

    The Submit a Ticket window opens.

  4. Enter the ticket information.

    Field

    Description

    Department

    Select Netgate Global Support.

    Software Product

    Select pfSense.

    Platform

    Select QNAP NAS.

    General Problem Description

    Select an appropriate option.

    Support Level

    Select Professional.

    QNAP License ID

    Enter your pfSense License ID.

  5. Click Submit.

Was this article helpful?

Thank you for your feedback.

Please tell us how this article can be improved:

If you want to provide additional feedback, please include it below.

Choose specification

      Show more Less

      Choose Your Country or Region

      open menu
      back to top