QIoT Suite 2.0 with OPC UA - How to set up QIoT OPC UA Client, Server and Gateway
In this tutorial you will learn how to connect a QIoT OPC UA Client to a PLC (Programmable Logic Controller) for data collection, control, and monitoring.
You will also learn how to create a QIoT OPC UA Server to communicate with SCADA (Supervisory Control and Data Acquisition) and how to set up the QIoT OPC UA Gateway.
(Reference: OPC UA https://opcfoundation.org/about/opc-technologies/opc-ua/)
Preparation
You require these devices (or emulators/simulators of these devices):
- OPC UA Client: SCADA requires an OPC UA client (in this example we use the Prosys OPC UA Client: https://www.prosysopc.com/products/opc-ua-client/)
- OPC UA Server: PLC requires an OPC UA server (in this example we use the Prosys OPC UA Simulation Server: https://www.prosysopc.com/products/opc-ua-simulation-server/)
Launch OPC UA Server
Launch the OPC UA server from PLC or OPC UA Simulation Server and take a note of the Connection Address (UA TCP). Change the host name to the IP address (for example: opc.tcp://127.0.0.1:53530/OPCUA/SimulationServer)

Connect to the OPC UA Server
Step 1: Set up the QIoT OPC UA Client
- Click “OPC UA” > “Clients” > “+ Add Client”.

- Enter the client information and the OPC UA Server’s Connection Address. Click “Create”.
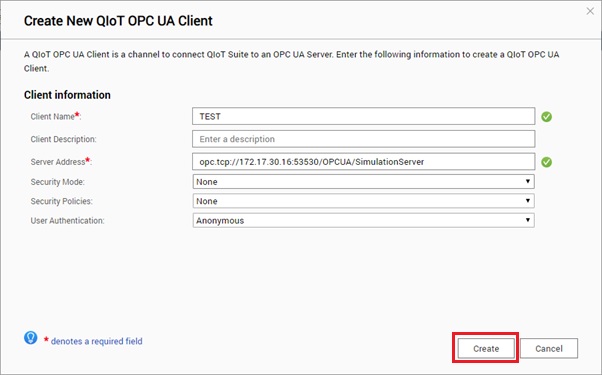
- The Connection Status should be “Connected”.

- Click
 to view the tag list from the connected OPC UA Server.


Step 2: Use Rules to Read and Write OPC UA Tags
Read:
- Open an IoT application and click “Rule”.

- Drag the “QOPCUA Client In” node to the panel.

- Double click the “QOPCUA Client In” node to display its properties.

Enter the following details:
- Name: Enter a name.
- Client: Select the created QIoT OPC UA Client.
- Action:
- Read: Polling means the client reads the server data at regular times (requested from server).
- Subscribe: When the tag value changes, the server will send a message to client (server sends out actively).
- Repeat: Set up a repeat time
- Read: Enter a polling time interval.
- Subscribe: Enter a time interval for subscription.
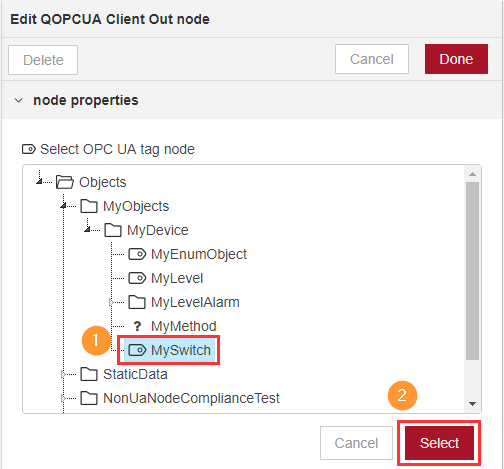
- Select OPC UA tag node:
- Select a tag to Read or Subscribe.
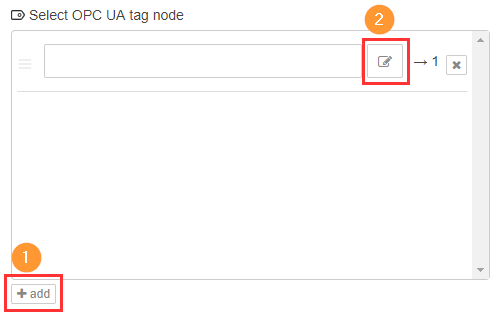

- Select a tag to Read or Subscribe.
- Click “Done” when finished.
- Connect a “debug” node with “QOPCUA Client In”.


- To view debug information on the Dashboard, see the following tutorial: How to use the Dashboard after updating QIoT Suite Lite from v1.1.1 to v1.1.2?

Write (Using an inject node as an example):
- Open an IoT application and click “Rule”.
- Drag a “QOPCUA Client Out” and two “inject” nodes to the panel and connect them as follows:

- In the “QOPCUA Client Out” node properties, choose the created QIoT OPC UA Client, set the type as “Boolean”, and select a tag.

- When setting the “inject” nodes properties, use the same values as in the previous step and follow the below images to set up payload data format. As this example uses “Boolean” and the payload format is JSON, you must enter {"value":true} and {"value":false} for the Payloads.


- After saving these node properties, click the “inject” node and check the status of the OPC UA Server. The value should change to “True” or “False”.


Create a QIoT OPC UA Server
Set up the QIoT OPC UA Server
- Click “OPC UA” > “Servers” > “+ Add Server”.

- Enter the information for the QIoT OPC UA Server.

- (Optional) Create folders and tags.

- (Optional) Add proxy tags to the QIoT OPC UA server. By adding proxy tags, you can use the QIoT OPC UA server as an OPC UA gateway and read/write tag values from multiple OPC UA servers. For example, if there are ten PLC devices, you can use QIoT OPC UA Gateway to collect data from all ten devices. Connecting the SCADA to QIoT OPC UA Server is equivalent to connecting to 10 PLC devices and it can present multiple values with single connection. Choose the OPC UA Client Tags on the left, click
 , select the tags to be queried, and click “Edit” to set their query interval.


- If needed, you can add users to the QIoT OPC UA Server. Click “Create” when finished.

- Run the server.

- Take a note of the Server Address. You can reconfigure the settings of QIoT OPC UA Server again in Actions.

Launch OPC UA Client
Launch the OPC UA Client. Enter the QIoT OPC UA Server Address. You will see the tags and values after being connected.

* How to access the tag value of QIoT OPC UA Server in QIoT Rule:
To edit tag values from the QIoT OPC UA Server in Rule, you must create a QIoT OPC UA Client and connect it to QIoT OPC UA Server to access the Tag Value. For example: (Rule) QOPCUA Client In → QIoT OPC UA Client → QIoT OPC UA Server.
- Create an OPC UA Server and record the Server Address.
- Go to the Client page and create an OPC UA Client.
- Enter the server address and change the IP address to “127.0.0.1”.

- Choose the QOPCUA Client In/Out node in the QIoT Rule.


