Setting Up the FTP Server Using QuFTP Service


Last modified date: 2021-08-12

About QuFTP Service

QuFTP Service is a built-in File Transfer Protocol (FTP) application that allows system administrators to add and manage multiple FTP users and user groups, assign permissions to local and remote folders, and share local and remotely-mounted files across networks.

Configuring Static IP Address and DDNS Settings

  1. Log on to the NAS as an administrator.
  2. Go to Control Panel > Network & Virtual Switch.

    The Network & Virtual Switch window opens.

  3. Go to Network > Interfaces.
  4. Identify the adapter connected to the internet.
  5. Click > Configure.

    The Configure window opens.

  6. Configure the IPv4 settings.
    1. Select Use static IP address.
  7. Configure the static IP address settings.

    Setting

    Description

    Use static IP address

    Manually assign a static IP address. You must specify the following information:

    • Fixed IP address

    • Subnet mask

    • Default Gateway

    Jumbo Frame

    Jumbo Frames are Ethernet frames that are larger than 1500 bytes. They are designed to enhance Ethernet networking throughput, and to reduce CPU usage when transferring large files. The system supports the following MTU sizes:

    • 1500 bytes (default)

    • 4074 bytes

    • 7418 bytes

    • 9000 bytes

    Important:
    • All connected network devices must enable Jumbo Frames and use the same MTU size.

    • Only certain NAS models support Jumbo Frames.

    • Using Jumbo Frames requires a network speed of 1000 Mbps or faster.

    Network Speed

    Select the network transfer rate allowed by the network environment.

    Tip:

    Selecting Auto-negotiation will automatically detect and set the transfer rate.

    Important:

    The Network Speed field is automatically set to Auto-negotiation and hidden when configuring 10GbE & 40GbE adapters.

  8. Click Apply.
  9. Configure the DDNS settings.
    Note:

    Dynamic Domain Name System (DDNS) allows access to the NAS from the internet using a domain name rather than an IP address. Use the DDNS function if your internet service provider does not provide a static IP address to configure the device.

    1. Log on to the NAS as an administrator.
    2. Go to Control Panel > Network & Virtual Switch.

      The Network & Virtual Switch window opens.

    3. Go to Access Services > DDNS.
    4. Click Add.

      The DDNS(Add) window appears.

    5. Configure the DDNS settings.

      Setting

      Description

      Select DDNS server

      Select the DDNS service provider.

      Username

      Specify the username for the DDNS service.

      Password

      Specify the password for the DDNS service.

      Hostname

      Specify the hostname or domain name for the DDNS service.

      Check the External IP Address

      Specify how often to update the DDNS record.

    6. Click Apply.

Port Forwarding Configuration

If your device is connected behind a NAT-configured router, ensure to allow traffic on the FTP service ports on the router and configure port forwarding on the assigned static IP address.

To configure the FTP server, you must first forward port 21 to the LAN IP address of the device. Ensure to forward incoming traffic from port 8080 (default management port) to the LAN IP address of the device to remotely connect to the device.

Note:

To configure port forwarding on your router, see the router documentation. Port forwarding is also referred to as NAT server or virtual server depending on the product.

The following guide describes how FTP port forwarding is enabled on a QNAP router.

Enable FTP Application Layer Gateway (ALG)

The ALG function allows you to implement transparent network translation on the FTP server. Enable FTP ALG on your QNAP router to automatically configure port forwarding without adding a port forwarding rule.

  1. Log on to the router as an administrator.
  2. Go to the ALG page.

    Router

    Setting Location

    QHora-301W

    NAT/Firewall > NAT > ALG

    QMiro-201W / QMiroPlus-201W

    NAT > ALG

  3. Beside FTP ALG, click .

Configuring FTP Server Settings

Configure the FTP server to securely transfer files across the network using Secure Sockets Layer (SSL) and Transport Layer Security (TLS) protocols, and manage user access to FTP functions.

You can also define the FTP bandwidth and connection limitation for user accounts, and enable passive FTP to allow FTP clients to establish the data connection.

Configuring General FTP Server Settings

  1. Open QuFTP Service.
  2. Go to FTP Server > System > General.
  3. Select Enable the FTP server.
  4. Configure the FTP protocol settings.
    • FTP (Standard): Enable to use FTP with implicit SSL/TLS function. The server uses port 21 for secured and unsecured services.

      Note:

      FTP (Standard) is enabled by default.

    • FTP with SSL/TLS (Explicit): Enable to use FTP with explicit SSL/TLS function. Once the connection is established, the server uses the configured SSL certificates and selected TLS configuration to secure the connection.

  5. Configure the FTP with explicit SSL/TLS settings.
    1. Click Configure SSL Certificates to update the SSL certificate.

      For details, see the myQNAPcloud section of the QTS User Guide.

    2. Select the TLS protocol version.
      Important:

      Before selecting TLS 1.2 or later, ensure that all FTP clients support TLS 1.2.

  6. Specify the FTP port number.
    Note:

    FTP communications use port 21 by default to run FTP commands.

  7. Configure the SFTP and service binding settings.

    For details, see the Network & File Services section of the QTS User Guide.

  8. Configure the additional FTP server settings.
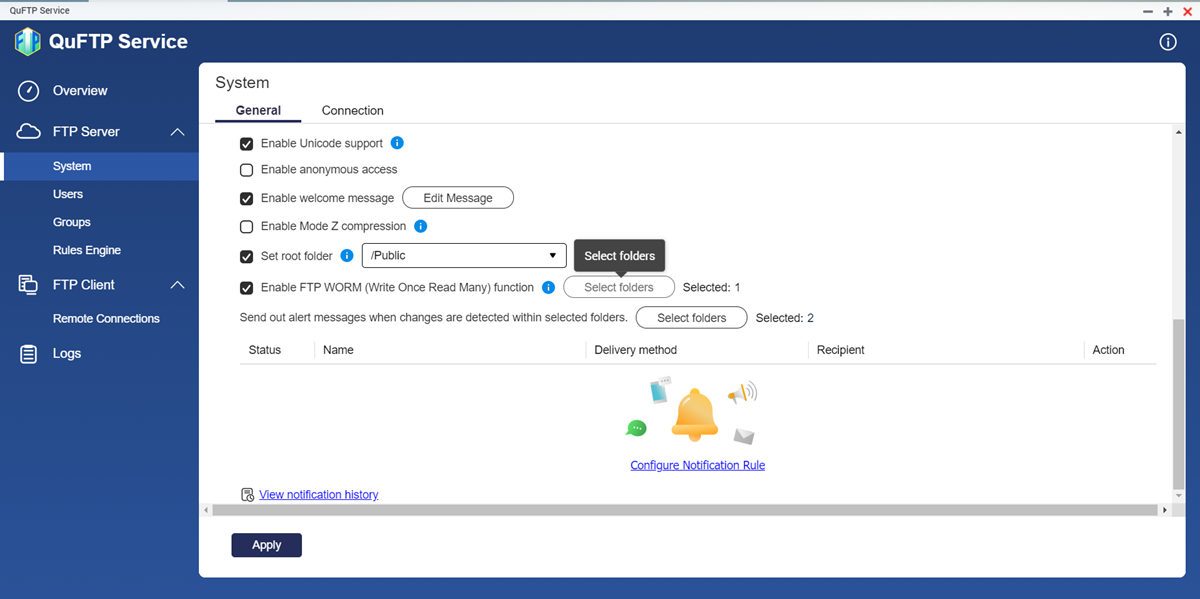
    Setting

    User Action

    Enable Unicode support

    Enable to allow the FTP server to support UTF-8 character encoding during file transfer.

    Enable anonymous access

    Enable to allow a user to log in anonymously instead of as a user-defined ID.

    Note:

    QNAP does not recommend using anonymous FTP. Enabling this function permits any user to access the FTP service without identification and could pose a security risk.

    Enable welcome message

    Enable to specify the message that the FTP service displays when FTP clients log in.

    1. Click Edit Message

    2. Specify the welcome message.

    3. Click Apply.

    Enable Mode Z compression

    Enable to allow the FTP clients to use the zlib software library to compress data transfers.

    Set root folder

    Enable to select the default FTP directory for FTP clients.

    Important:

    To use this feature, you must first provide root folder access to all the FTP clients in Users > Edit Shared Folder Permission.

    Alternatively, you can enable root folder access in Control Panel > Privilege > Shared Folders.

    Enable FTP WORM (Write Once Read Many) function

    Enable to implement WORM permissions on specified folders.

    1. Click Select Folders.

      The Select WORM (Write Once Ready Many) Folders window appears.

    2. Select the folders.

    3. Click Apply.

    Note:

    WORM folders cannot be erased or modified by FTP users.

  9. Configure alert notifications for selected folders.
    1. Beside Send out alert messages when changes are detected within selected folders, click Select Folders.

      The Select folders to monitor window appears.

    2. Select the folders from the local volume.

      The folder path appears in the right panel.

      Tip:

      Click to remove the selected folder.

    3. Specify the time interval to send out alerts.
    4. Click Apply.
    5. Click Configure Notification Rule.

      Notification Center opens and the Create event notification rule window appears.

    6. Configure the notification rules.

      For details, see the Notification Center section of the QTS User Guide.

  10. Click Apply.

QuFTP Service temporarily stops the application to apply the settings.

Configuring FTP Server Connection Settings

  1. Open QuFTP Service.
  2. Go to FTP Server > System > Connection.
  3. Configure the FTP connection limitations.
    1. Specify the maximum number of allowed FTP connections.
    2. Specify the maximum number of connection per FTP user.
  4. Configure the FTP speed limitations.

    Setting

    User Action

    FTP transfer limitations

    1. Click Enable FTP transfer limitations.

      The FTP bandwidth settings become accessible.

    2. Specify the maximum upload rate.

    3. Specify the maximum download rate.

    Speed limitations

    1. Click Enable speed limitation for users and groups.

      The speed limitation settings become accessible.

    2. Click Speed Limits.

      The Speed Limits window appears.

    3. Select the FTP client type.

    4. Under Active, select the user or user group checkbox.

    5. Specify the maximum upload and download rate.

    6. Click Apply.

  5. Configure the passive FTP settings.
    Note:

    The Use the default port range setting is enabled by default.

    The default passive FTP port range is 55536-56559.

    1. Select Define port range.
    2. Specify the passive FTP port range between 1025 and 65535.
    3. Select Respond with external IP address for passive FTP connection request.
      Note:

      Specify an external IP address only when the FTP server is behind the NAT configuration.

    4. Specify the external IP address.
  6. Click Apply.

QuFTP Service applies the settings.

Was this article helpful?

41% of people think it helps.
Thank you for your feedback.

Please tell us how this article can be improved:

If you want to provide additional feedback, please include it below.

Choose specification

      Show more Less

      Choose Your Country or Region

      open menu
      back to top