-
What is Qfinder Pro?
-
System requirements
-
Before you start
-
Manage QNAP devices
-
Initialize a QNAP device
-
Update or install firmware on a QNAP device
-
Startup, shutdown, or restart a QNAP device
-
Manually add a QNAP device to Qfinder Pro
-
-
Manage settings for QNAP devices
-
Configure device settings
-
View device details
-
View the device Cloud Key
-
Enable SSH connections
-
-
Monitor performance of QNAP devices
-
Upload files and folders to QNAP devices
-
Activate licences for QNAP devices
-
Mount NAS shared folders as network drives
-
Mount shared folders on Windows
-
Mount shared folders on macOS
-
-
Further reading and resources
This guide is applicable to Qfinder Pro 7.0 and later.
What is Qfinder Pro?
Qfinder Pro is a desktop utility that allows you to quickly search and manage your QNAP devices. Qfinder Pro can connect to QNAP devices on your local internet, or via the Internet with myQNAPcloud Link. You can perform a range of essential management tasks, such as, restarting or waking-up a device, updating a device's firmware, viewing a device's real-time resource usage, or mounting shared folders on a QNAP device as network folders on your PC or macOS. Qfinder Pro allows you to quickly and efficiently manage a single QNAP device, or multiple QNAP devices simultaneously, thereby greatly streamlining and reducing your administrative overhead.

System requirements
Supported operating systems:
- Windows 8.0 or later
- Windows Server 2016 or later
- macOS 12 (Monterey) or later
- Ubuntu 18.04
Before you start
To get started using Qfinder Pro, perform the following:
- Connect your QNAP device to your local area network.
- Ensure that your computer is connected to the same local area network.
- Download and install Qfinder Pro on your computer.
Manage QNAP devices
You can manage various functions of your QNAP device in Qfinder Pro. The device list of the main page automatically lists all QNAP devices that can be discovered on your local area network.

| Label | Area | Example Actions |
|---|---|---|
| 1 | Main toolbar |
Tip Some functions require you to select a device on the device list first. To select a device on the device list, locate the device and click the device name. |
| 2 | Main action bar |
|
| 3 | Device list |
|
| 4 | Context menu |
|
| 5 | Status column |
|
| 6 | Refresh button |
|
| 7 | Quick action bar |
|
Initialize a QNAP device
Initializing a QNAP device involves installing an operating system on your QNAP device and configuring the basic settings required for the device to operate. For instructions on initializing QNAP devices with Qfinder Pro, see the section "Overview > QTS initialization > Initializing QTS using Qfinder Pro" in the QTS User Guide or QuTS hero User Guide.
Update or install firmware on a QNAP device
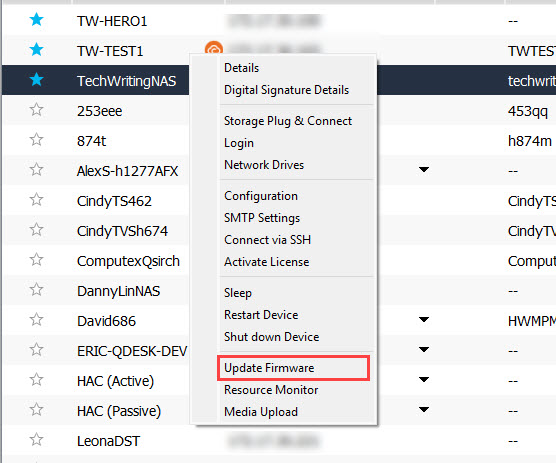
You can manually update and install firmware on your QNAP device.
- Open Qfinder Pro.
- Find your QNAP device in the device list.
- Right click the table row of your device.
The device context menu opens. - Click Update Firmware.
 The Login window opens.
 - Enter your QNAP device login credentials and click OK.
The Update Firmware window opens. - Select one of the following options:
- Automatically update the firmware to the latest version: Update the firmware to the latest available version. This option is not available if your device already has the latest firmware version installed.
- Path of the system firmware image file: Select a firmware file to install. Firmware installation files can be downloaded from Download Center.
- Click Start.
Qfinder updates or installs firmware on the QNAP device.
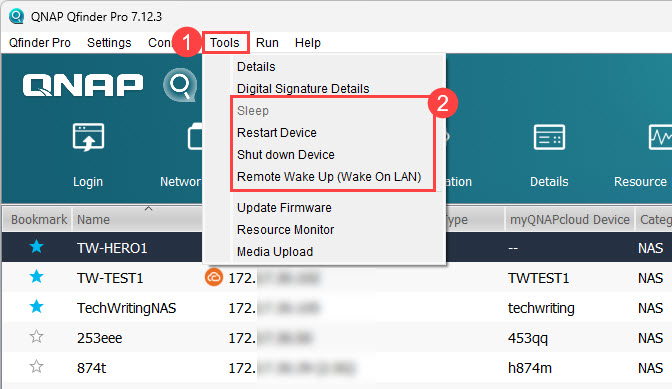
Startup, shutdown, or restart a QNAP device
You can perform basic power operations on QNAP devices, such as starting up, shutting down, and restarting a device.
- Open Qfinder Pro.
- Find your QNAP device in the device list.
- Click the table row of your device to select your device.
- Click Tools from the main menu.
- Select a power operation: Sleep, Restart Device, Shut down Device, Remote Wake Up (Wake On LAN).
 The Login window opens.
 - Enter your QNAP device login credentials and click OK.
Qfinder Pro performs the selected power operation on the device.
Manually add a QNAP device to Qfinder Pro
If your QNAP device is not automatically discovered by Qfinder Pro and listed on the main page, you can manually add the device:
- Open Qfinder Pro.
- Near the top right of the window, click
 .
.
The Add Devices window opens. - Click one of the following options:
- Add devices from your QNAP account: Select a device that is linked to your QNAP account.TipFor details on linking your QNAP device to your QNAP account, see the section "myQNAPcloud > Initial setup" in the QTS User Guide or QuTS hero User Guide.
- Add a device via an IP address: Add a QNAP device by using that device's IP address.
- Add devices from your QNAP account: Select a device that is linked to your QNAP account.
- Follow the remaining steps to add the device.
After the device is added to Qfinder Pro, the device will appear on the device list.
Manage settings for QNAP devices
You can view and configure various settings of QNAP devices.
Configure device settings
You can configure certain settings on your QNAP device
- Open Qfinder Pro.
- Find your QNAP device in the device list.
- Click the table row of your device to select your device.
- Click the Configuration icon
 .
.
The Configuration window appears.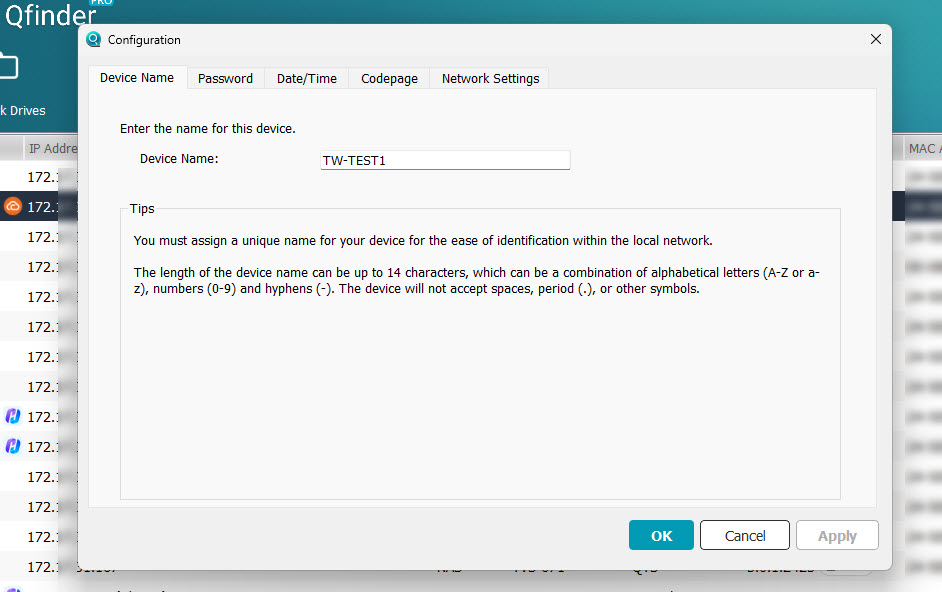
- Select a tab and configure the related settings.
- Click Apply to save and apply any configuration changes.
- Click OK.
View device details
You can view certain details about your QNAP device
- Open Qfinder Pro.
- Find your QNAP device in the device list.
- Click the table row of your device to select your device.
- Click Tools from the main menu.
- Click Details from the tool menu.
The Login window opens. - Enter your QNAP device login credentials and click OK.
The Device Details window opens.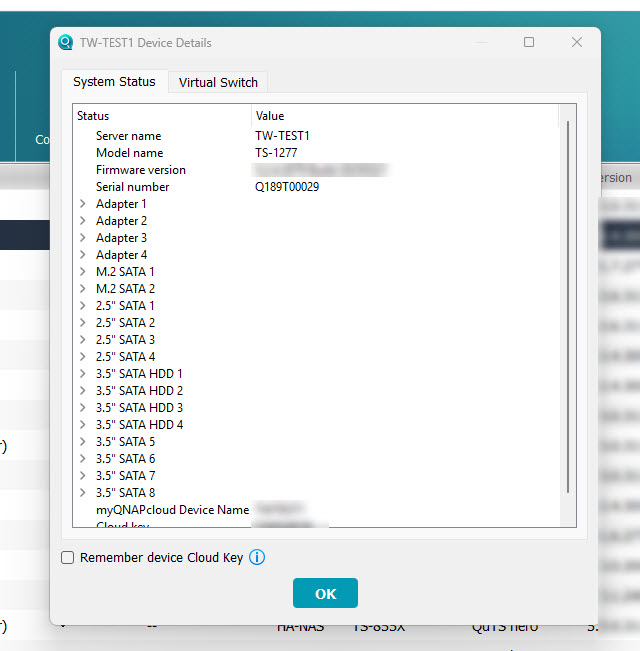
- Select a tab:
- System Status: Displays information related to the status of the system and storage drives.
- Virtual Switch: Displays information related to virtual switches configured on your device.
- When you are finished viewing device details, click OK to close the Device Details window.
View the device Cloud Key
You can view the Cloud Key of your QNAP device.
- Open Qfinder Pro.
- Find your QNAP device in the device list.
- Click the table row of your device to select your device.
- Click Tools from the main menu.
- Click Details from the tool menu.
The Login window opens. - Enter your QNAP device login credentials and click OK.
The Device Details window opens. - Go to the System Status tab.
- Scroll down to view the Cloud Key field.
Enable SSH connections
You can enable and disable SSH connections on your QNAP device. To connect to a QNAP device via SSH, see How do I access my QNAP NAS using SSH?.
- Open Qfinder Pro.
- Find your QNAP device in the device list.
- Click the table row of your device to select your device.
- Click Settings > SSH Connection Settings from the main menu.
The Login window opens. - Enter your QNAP device login credentials and click OK.
The SSH Connection Settings window opens. TipIf Allow SSH connections is enabled when the Connect via SSH window opens, you can click Cancel to exit without changing any settings.
 - Enable Allow SSH connections.
- Click Apply.
SSH is enabled on the selected device.
Monitor performance of QNAP devices
You can monitor various performance aspects of your QNAP device with Qfinder Pro
- Open Qfinder Pro.
- Find your QNAP device in the device list.
- Click the table row of your device to select your device.
- Click Tools > Resource Monitor from the main menu.
The Login window opens. - Enter your QNAP device login credentials and click OK.
The Resource Monitor window appears.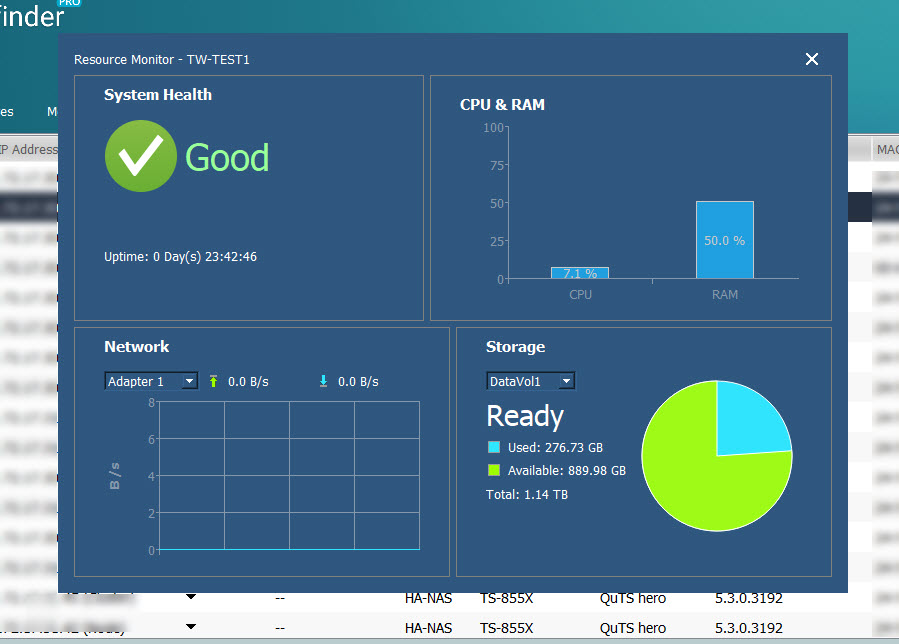 You can view various performance related details of your QNAP device in real time.TipYou can also use the built-in app Resource Monitor on your QNAP device. For details, see the section "System Settings > Monitoring System Status and Resource Monitor" in the QTS User Guide or QuTS hero User Guide.
Upload files and folders to QNAP devices
You can upload files and folders to your QNAP device.
- Open Qfinder Pro.
- Find your QNAP device in the device list.
- Click the table row of your device to select your device.
- Click Tools > Media Upload from the main menu, or click
 .
.
The Login window opens. - Enter your QNAP device login credentials and click OK.
The Media Upload window appears.
- Click
 to create an upload job.
 - Upload files and folders using the following methods:
- Click
 to select files to upload.
 - Click
 to select folders to upload.
- Click
- Under Destination, click Change and select a destination folder on your QNAP device.
- Optional: Configure other upload options.
- Click
 Start Upload.
Qfinder Pro creates an upload job for your selected files and folders.
Activate licences for QNAP devices
You can activate licences for apps and services on your QNAP device.
- Open Qfinder Pro.
- Find your QNAP device in the device list.
- Click the table row of your device to select your device.
- Click Settings > Activate License from the main menu.
The Login window opens. - Enter your QNAP device login credentials and click OK.
The License Activation window opens. - Under Activate with QNAP ID, click
 .
.
The Login to myQNAPcloud window appears. - Enter the QNAP ID login credentials.
- Click Sign in.
 The Qfinder Pro License Activation window opens.
 - Return to Qfinder Pro and go to the License Activation window.
- Select one or more licenses to activate.
- Click Activate.
Qfinder Pro activates the selected licenses and a confirmation window appears. - Click Close.
Mount NAS shared folders as network drives
You can mount shared folders on your NAS as network drives on your PC or macOS computer.
Mount shared folders on Windows
- Open Qfinder Pro.
- Find your QNAP device in the device list.
- Click the table row of your device to select your device.
- Click Connect > Storage Plug & Connect from the main menu.
The Login window opens. - Enter your QNAP device login credentials and click OK.
The Storage Plug & Connect window opens. Shared folders on your QNAP device are displayed.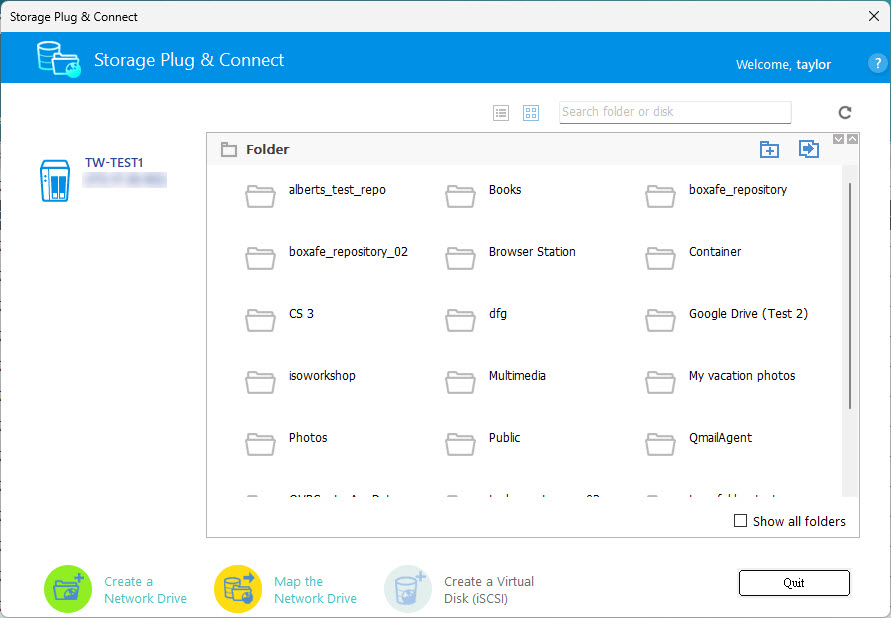 TipTo configure Storage Plug & Connect related settings, go to Preference > Storage Plug & Connect.
 - Click a shared folder to select it.TipFor details on creating shared folders on your QNAP device, see the section "Privilege Settings > Shared folders > Creating a shared folder" in the QTS User Guide or QuTS hero User Guide.
- Click Map the Network Drive.
- Select a drive.
- Click Ok.
Qfinder Pro mounts the NAS shared folder as a network drive on your PC.
Mount shared folders on macOS
- Open Qfinder Pro.
- Find your QNAP device in the device list.
- Click the table row of your device to select your device.
- Click Connect > Network Drives from the main menu.
The Network Drives window opens.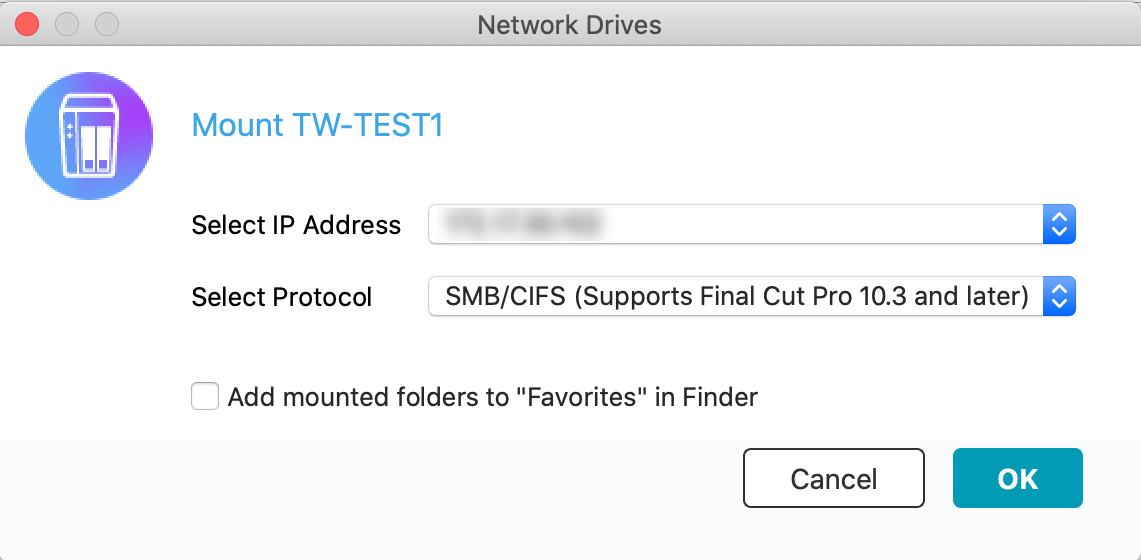
- Select an IP address and a protocol, and click OK.
A confirmation window appears.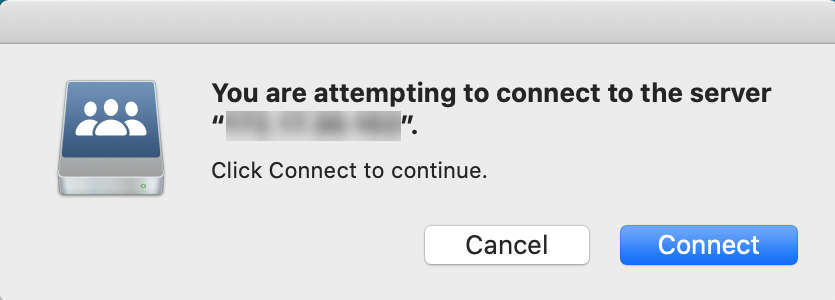
- Click Connect.
- Enter your Mac username and password, and then click OK.
- Click Connect.
The volume selection window opens.
- Select a shared folder and click OK.
The selected shared folder is mapped as a network drive.


