QuWAN vRouter is a cloud-delivered SD-WAN solution that can be deployed on third-party Virtual Machine (VM) platforms.
QuWAN vRouter enables seamless interconnection between QNAP's SD-WAN solution and hypervisors. It provides easy configuration, provisioning, and troubleshooting of wide area network (WAN) using simplified deployment techniques.
To use QuWAN vRouter, you must purchase and activate a QuWAN vRouter license from the QNAP Software Store.
QuWAN vRouter license is a subscription-based license. QNAP Software Store provides various subscription plans. You can choose a subscription period and data transfer rate plan according to your needs.
- Go to https://software.qnap.com.
- Log in with your QNAP ID.
Note: If you do not have a QNAP account, you must first sign up for an account.
- In the search box, enter QuWAN vRouter.
QuWAN vRouter appears in the search results.
- Select QuWAN vRouter.
- Select a subscription plan.
- Specify the number of licenses.
- Click ADD TO CART.
- Click
 .
. - Verify the content in your shopping cart.
- Click GO TO CHECKOUT.
- Specify your payment information.
- Select I AGREE WITH QNAP TERMS AND CONDITIONS.
- Click Pay with PAYPAL.
The Pay With PayPal window appears.
- Specify your PayPal account information and complete the payment.
- Click Log In.
The PayPal Checkout window appears.
- Click Click to Continue.
QNAP Software Store completes the payment process.
- Transfer the QuWAN vRouter license subscription from your personal QNAP ID to your QuWAN organization.
- Click Activate License.
The QNAP License Manager page opens.
- Log in with your QNAP ID.
QNAP License Manager displays the list of purchased licenses.
- Identify the QuWAN vRouter license subscription.
- Under Advanced Options, click
 .
. The Transfer License window appears.
- Click Next.
- Select your QuWAN organization.
Important: Once you transfer the license to an organization, you cannot transfer it back to your QNAP ID or a different organization.
- Click Transfer.
QNAP License Manager transfers the license to your QuWAN organization.
- Click OK.
The Transfer License window closes.
Tip: To upgrade a subscription, go to .
To check the status of purchased licenses on QuWAN Orchestrator, go to http://www.quwan.qnap.com and then click License Subscriptions.
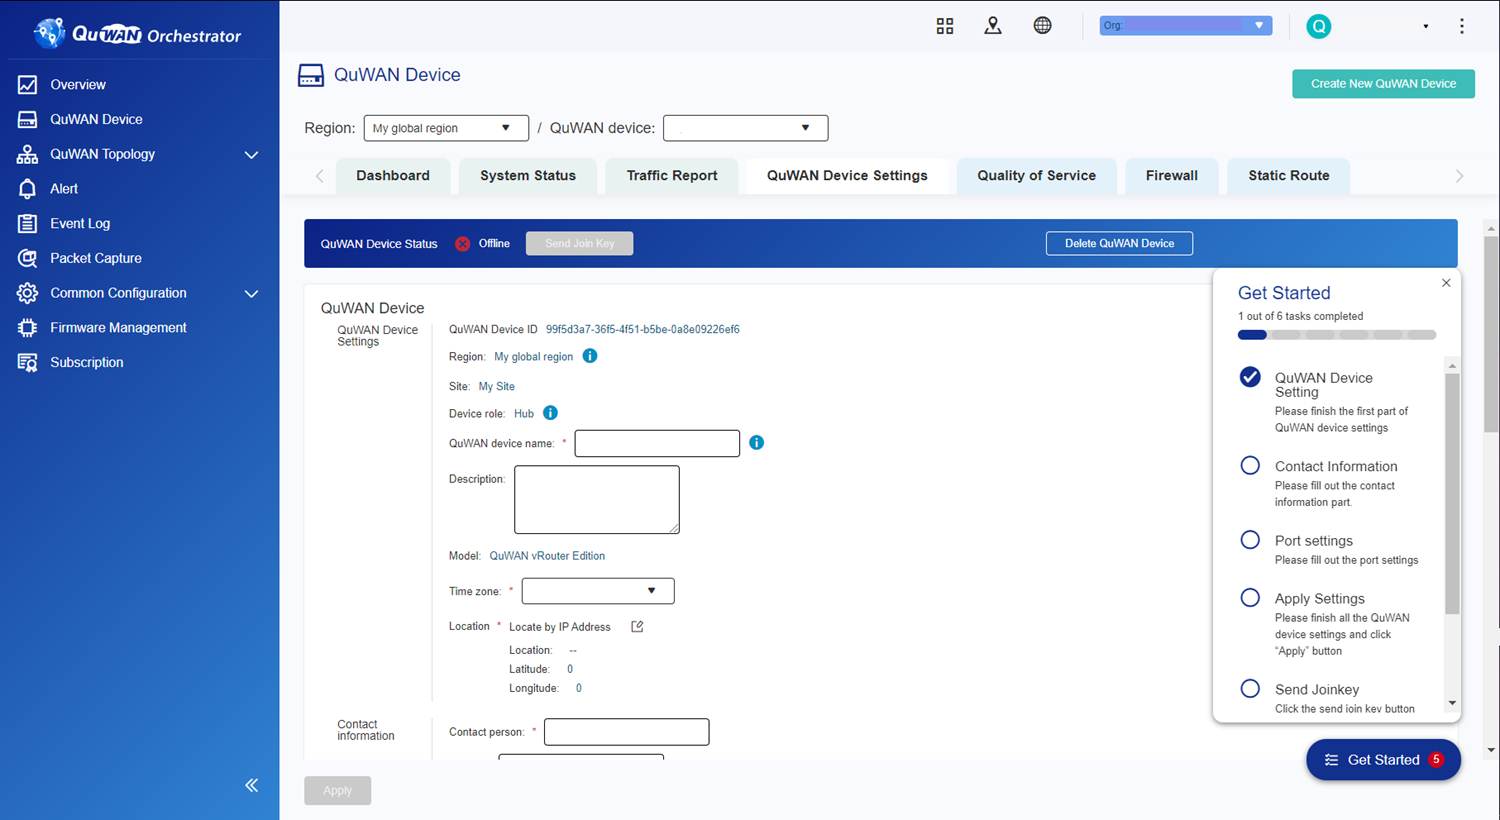
After purchasing a QuWAN vRouter license, you must create a QuWAN device and then create a join key.
Note: Device administrators are required to provide a valid join key while configuring QuWAN vRouter.
- Go to https://quwan.qnap.com.
- Log in to QuWAN Orchestrator.
The Overview page appears.
- Go to QuWAN Device.
- Click Create New QuWAN Device.
The Create New QuWAN Device window appears.
- Specify the following information.
| Setting | User Action |
| Region | Select a region from the drop-down list. Tip: To add a new region, go to and then click Add Region. |
| Site | Select a site from the drop-down list. |
| QuWAN device name | Specify a name for your QuWAN device. |
| Device model | Select QuWAN vRouter Edition if you are installing QuWAN on a third-party hypervisor. |
| License | Select a license type from the list of purchased licenses. Note: The selected license is linked to the QuWAN device. |
- Click Create.
QuWAN Orchestrator creates the QuWAN device and the QuWAN Device Settings page appears.
- Specify the contact information.
| Setting | User Action |
| Contact person | Specify the name of the device administrator. |
| Email | Specify the email of the device administrator. |
| Phone | Specify the phone number of the device administrator. |
- Configure the network settings.
- Configure port 1 settings.
- Click
 .
. The Port 1 Configuration window opens.
- Configure the WAN IP settings.
| Setting | User Action |
| Obtain IP address settings automatically via DHCP | Select this option to automatically obtain an IP address. If the network supports DHCP, the device port automatically obtains the IP address and network settings. |
| Static IP address | Select this option to manually specify an IP address. When assigning a static IP address, specify the following information: -
Fixed IP address -
Subnet mask -
Default gateway |
| PPPoE | Select this option to specify a username and password for Point-to-Point Protocol over Ethernet (PPPoE). |
- Configure the remaining settings.
| Setting | User Action |
| ISP line rate | Specify the gross bit rate of the physical layer in terms of transmitting and receiving data rate. |
| Description | Enter the WAN port description. |
- Click Save.
QuWAN Orchestrator updates the WAN settings.
- Configure the port 8 settings.
- Click .
The Port 8 Configuration window opens.
- Configure the LAN IP settings.
| Setting | User Action |
| Segment | Select the LAN segment type from the drop-down list. |
| Fixed IP address | Specify a fixed IP address. |
| Subnet Mask | Specify the subnet mask used to subdivide your IP address. |
- Optional: Enable DHCP service.
- Specify the DHCP service type.
- Configure the DHCP settings.
| Setting | User Action |
| Start IP | Specify the starting IP address in a range allocated to DHCP clients. |
| End IP | Specify the ending IP addresses in a range allocated to DHCP clients. |
| Lease time | Specify the length of time that an IP address is reserved for a DHCP client. The IP address is made available to other clients when the lease expires. |
| DNS servers | Specify a DNS server for the DHCP server. Tip: Specify up to 3 DNS servers and separate them using commas (,). |
| Description | Enter the LAN port description. |
- Click Save.
- Optional: Select a DNS server.
- Specify the Network Time Protocol (NTP) server.
Note: The default NTP server is pool.ntp.org.
- Enable Simple Network Management Protocol (SNMP).
- Click Apply.
QuWAN Orchestrator updates the device information.
After creating a QuWAN device, you must send the join key to the device administrator.
- Go to https://quwan.qnap.com.
- Log in to QuWAN Orchestrator.
The Overview page appears.
- Go to QuWAN Device.
- Select the region and QuWAN device.
- Select QuWAN Device Settings.
- Click Send Join Key.
A confirmation message appears.
- Verify if you have received the join key email.
To deploy QuWAN vRouter, you must create a virtual machine using the QuWAN vRouter image file. QuWAN vRouter is currently supported on the VMware ESXi version 7.0 platform.
After you deploy the virtual machine, configure the VM settings and assign network adapters to the virtual SD-WAN image.
After sending the join key to the QuWAN device administrator and downloading the image, you must deploy QuWAN vRouter on the VM platform.
Important: QuWAN vRouter is only supported on VMware ESXi version 7.0 and later.
- Download the QuWAN vRouter image.
- Go to https://www.qnap.com/en-us/download.
- Select QuWAN vRouter Edition as the product type and model.
- Under Download Link, click
 .
. The device downloads the VM image.
- Unzip the downloaded file.
- Log in to VMware ESXi.
- Create the virtual machine.
- On the left panel, go to Virtual Machines.
- Click Create/Register VM.
The New Virtual Machine window opens.
- Select the creation type.
- Select Deploy a virtual machine from an OVF or OVA file.
- Click Next.
- Select the VM files.
- Enter a name for the VM.
- Click Click to select files or drag/drop.
A file explorer window opens.
- Locate the unzipped folder.
- Select all the files within the folder.
- Click Open.
The file explorer window closes.
- Configure the VM storage.
- Use the default option.
- Click Next.
- Configure the deployment options.
- For Network Mappings select VM network.
- Deselect Power on automatically.
- Click Next.
Note: Adjust these settings based on your specific needs.
- Review the settings.
- Click Finish.
VMware ESXi creates the VM.
- Configure the virtual switch (vSwitch) settings.
Important: Ensure to power off the virtual machine before configuring the virtual switch settings.
- Go to .
- Click Add standard virtual switch.
The Add standard virtual switch - New switch window appears.
- Configure the virtual switch settings.
Important: QuWAN vRouter requires three vSwitches to operate. One vSwitch is linked to the WAN connection, another vSwitch is linked to the LAN connection, and the remaining six vSwitches are reserved for internal VM usage.
| Setting | User Action |
| vSwitch name | Specify a name for the virtual switch. Note: Tip: The default vSwitch name is New switch. QNAP recommends changing the name to vSwitch0. |
| MTU | Specify the Maximum Transmission Unit (MTU) size. |
| Uplink 1 | Select a physical uplink to connect to the virtual switch. |
- Click Add.
VMware ESXi adds the vSwitch.
- Configure port group settings.
Important: You must create three port groups and connect each port group to the created vSwitches.
-
QuWAN vRouter requires eight virtual ports. Create a WAN port group and connect it to the default vSwitch that is connected to the network.
-
Create a LAN port group and connect it to a second vSwitch.
-
Create a third port group to connect the remaining vSwitches.
- Go to .
- Click Add port group.
The Add port group - New port group window appears.
- Configure the port group settings.
| Setting | User Action |
| Name | Specify a custom port group name for the QuWAN vRouter port group. Tip: The default port group name is New port group. QNAP recommends using the following port group name format: QuWAN_[interface]_[port number]. Using this format, you can create the following port group names: QuWAN_WAN_1 and QuWAN_LAN_8. |
| VLAN ID | Specify the VLAN ID to configure the VLAN tagging in the port group. |
| Virtual switch | Select a virtual switch from the drop-down menu. |
- Expand Security to configure promiscuous mode, MAC address changes, and forged transmits settings.
- Click Add.
VMware creates the port group and connects the port group to the selected vSwitch.
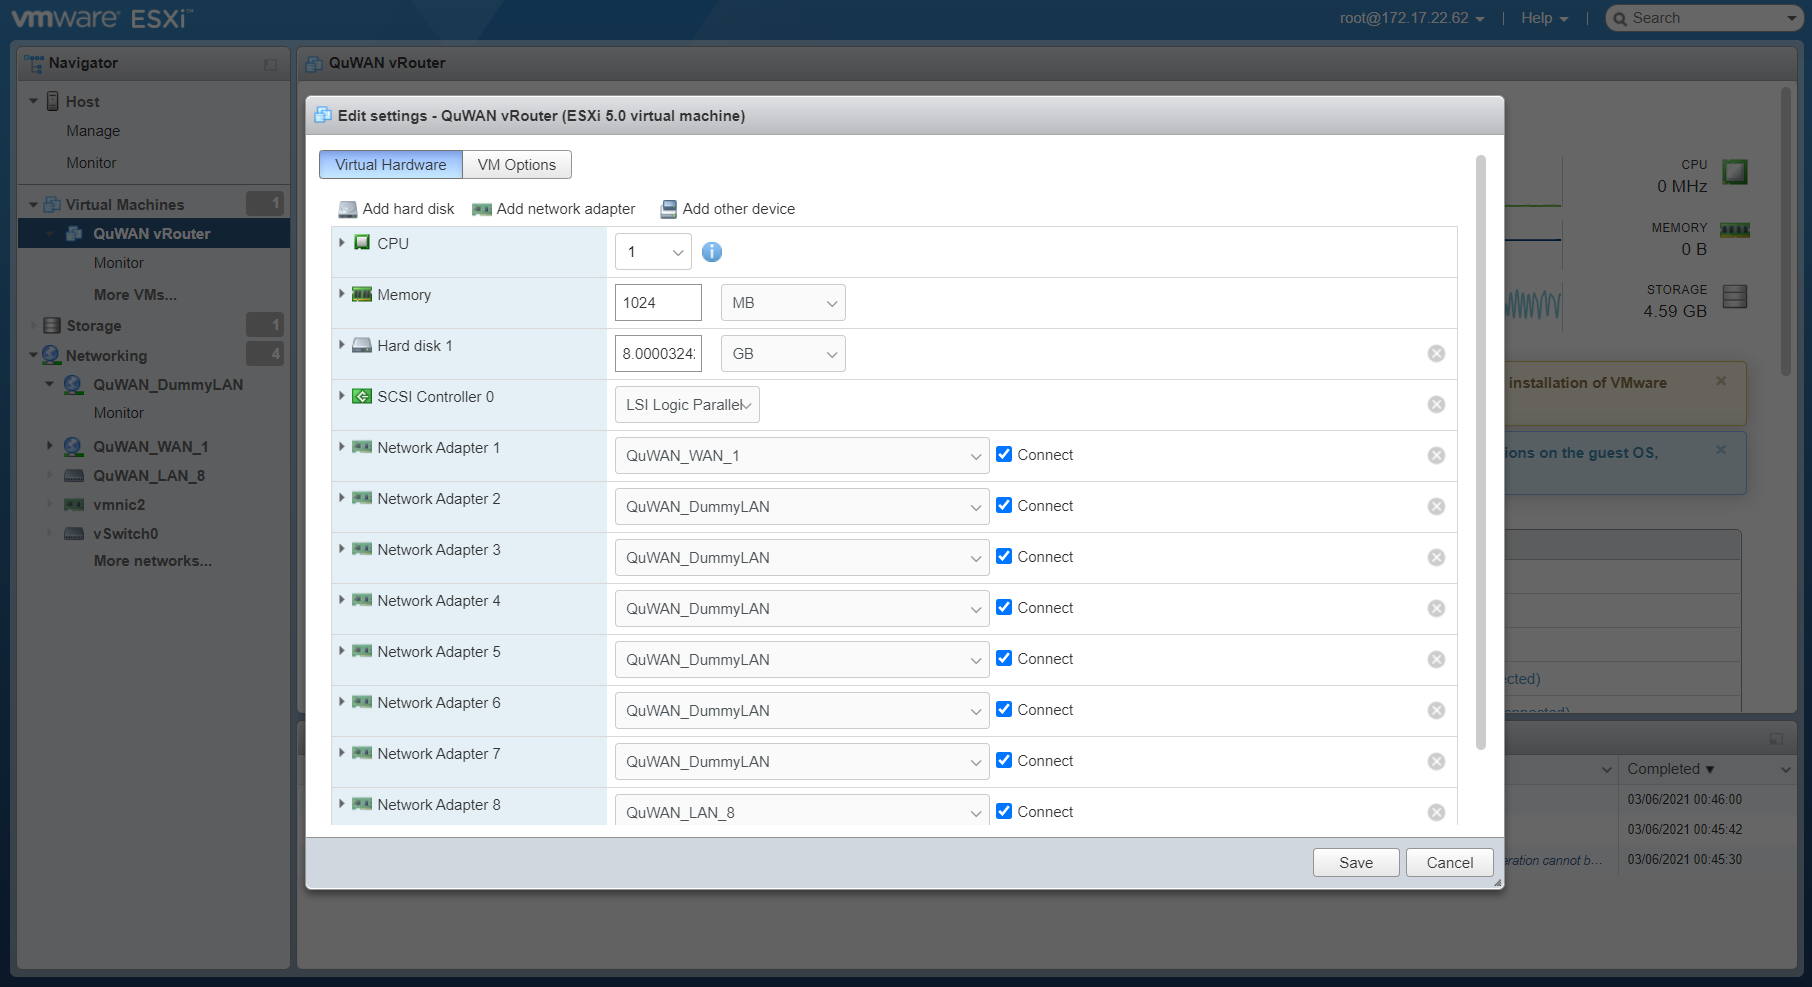
After deploying QuWAN vRouter on VMware ESXi, you must configure the VM settings and assign port groups to the network adapters.
- Go to .
- Click Edit.
The Edit settings window opens.
- Expand CPU to allocate CPU resources.
| Option | User Action |
| Reservation | Specify the guaranteed minimum CPU allocation for the virtual machine. |
| Limits | Specify the upper limit for the CPU allocation. Tip: Select Unlimited to specify no upper limit. |
| Shares | Allocate CPU shares with respect to the total number of virtual CPUs available to the system. |
- Expand Memory to allocate memory resources.
| Setting | User Action |
| Reservation | Specify the guaranteed minimum memory allocation for the virtual machine. |
| Limits | Specify the upper limit for the memory allocation. Tip: Select Unlimited to specify no upper limit. |
| Shares | Allocate memory shares with respect to the total memory available to the system. |
- Expand Hard disk to change the virtual disk settings.
| Setting | User Action |
| Hard disk | Specify the virtual disk size for the virtual machine. |
| Shares | Allocate virtual disk shares with respect to the total disk size available to the system. |
| Limit - IOPs | Specify the value of the upper limit of I/O operations per second allocated to the virtual disk. |
| Disk mode | Select a disk mode to determine how the virtual disk is affected by VM snapshots. |
- Expand Network Adapter to configure the network adapter settings.
| Setting | User Action |
| Network Adapter | Select a port group from the drop-down menu to connect to the network adapter. |
| Status | Select Connected when the VM is powered on to connect to the virtual network adapter. Select Connect at power on to connect to the VM when it powers on. |
- Configure the network adapter settings for all 8 adapters.
- Click Save.
- Go to VM Options to configure the general VM settings.
- Click Save.
VMware ESXi saves the settings.
- Click Power on.
VMware ESXi powers on QuWAN vRouter.
After deploying and configuring QuWAN vRouter on VMware ESXi, you must initialize QuWAN vRouter.
- Verify if your device is connected to QuWAN port 8 on the VMware platform.
- Log in to VMware ESXi.
- On the left panel, go to Networking.
- Click Virtual switches.
- Select the LAN vSwitch.
The LAN vSwitch page appears.
- Under vSwitch Topology, verify if the vSwitch is connected to the physical adapter.
Important: Verify if your computer is connected to the physical adapter.
- Open a web browser on your computer.
- Enter local.quwan.
The Welcome to QuWAN page appears.
- Click Start.
The Password Settings page appears.
- Specify a username and password for the QuWAN vRouter account.
- Click Save.
The QuWAN Port 1 Settings page appears.
- Configure the WAN IP settings.
| Setting | User Action |
| Obtain IP address settings automatically via DHCP | Select this option to automatically obtain an IP address. If the network supports DHCP, the device port automatically obtains the IP address and network settings. |
| Static IP address | Select this option to manually specify an IP address. When assigning a static IP address, specify the following information: -
Fixed IP address -
Subnet mask -
Default gateway |
| PPPoE | Select this option to specify a username and password for Point-to-Point Protocol over Ethernet (PPPoE). |
- Click Next.
The Enter Join Key page appears.
- Enter the join key.
- Select the domain type.
- Click Submit.
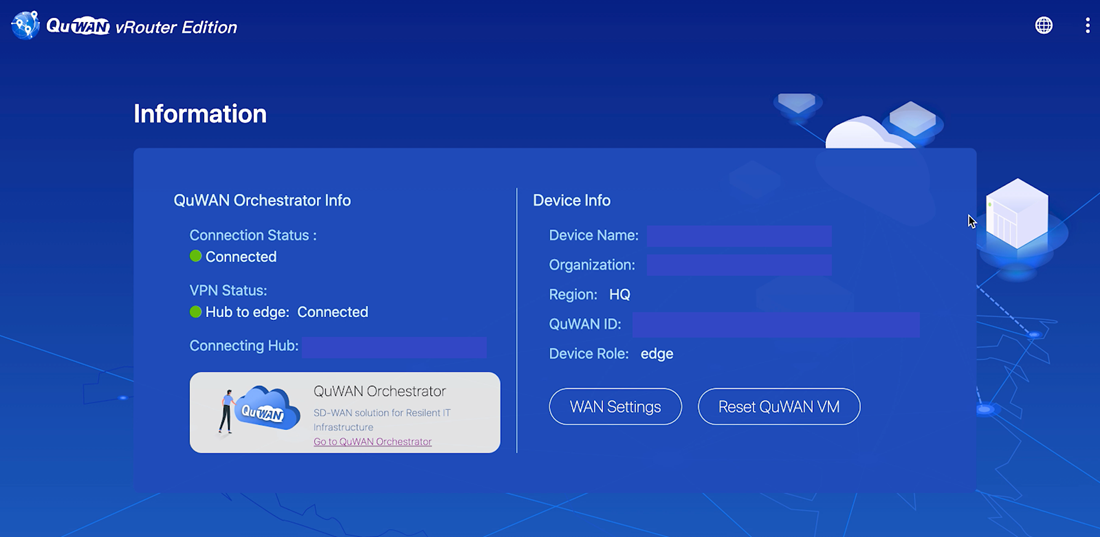
The device initializes the QuWAN vRouter deployment and displays the information screen after deployment is finished.
QuWAN vRouter is now ready for use. Go to https://quwan.qnap.com to access QuWAN Orchestrator. You can configure and manage multiple QuWAN devices within a single organization.
To learn more about how to use QuWAN Orchestrator, refer to the QuWAN Orchestrator Help at https://docs.qnap.com/cloud/quwan/en-us/index.html.