Dear myQNAPcloud users:
As a contingency measure against the GNU Bash (Shellshock) vulnerability, we will temporarily suspend the myQNAPcloud DDNS service, starting at 4 pm, Oct 7, Taipei time (GMT+8; please refer to the following table for your region.) To protect your Turbo NAS from possible exploitations, we recommend that you update your NAS firmware to the latest version (QTS 4.1.1 Build 1003) immediately. To restore the DDNS service for your Turbo NAS after firmware update, please follow the below steps to restart the myQNAPcloud DDNS service.
Time Zones Table
| GMT |
10/7 08:00 |
GMT-1 |
10/7 07:00 |
| GMT+1 |
10/7 09:00 |
GMT-2 |
10/7 06:00 |
| GMT+2 |
10/7 10:00 |
GMT-3 |
10/7 05:00 |
| GMT+3 |
10/7 11:00 |
GMT-4 |
10/7 04:00 |
| GMT+4 |
10/7 12:00 |
GMT-5 |
10/7 03:00 |
| GMT+5 |
10/7 13:00 |
GMT-6 |
10/7 02:00 |
| GMT+6 |
10/7 14:00 |
GMT-7 |
10/7 01:00 |
| GMT+7 |
10/7 15:00 |
GMT-8 |
10/7 00:00 |
| GMT+8 |
10/7 16:00 |
GMT-9 |
10/6 23:00 |
| GMT+9 |
10/7 17:00 |
GMT-10 |
10/6 22:00 |
| GMT+10 |
10/7 18:00 |
GMT-11 |
10/6 21:00 |
| GMT+11 |
10/7 19:00 |
GMT-12 |
10/6 20:00 |
| GMT+12 |
10/7 20:00 |
|
|
| GMT+13 |
10/7 21:00 |
|
|
| GMT+14 |
10/7 22:00 |
|
|
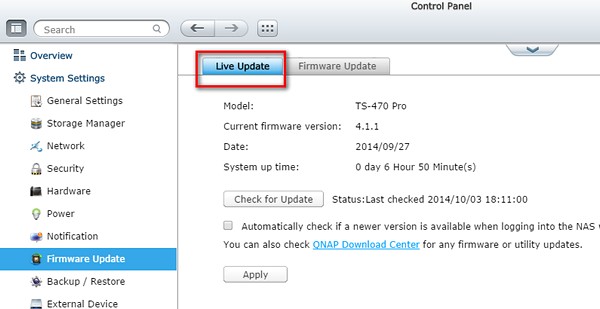
Follow the below steps to update NAS firmware and restart the DDNS service:
- Update NAS firmware
- Restart the myQNAPcloud DDNS service: